This guide will show you every single step of my personal blueprint that I’ve been using to rank for many “top X” and “best Y” types of keywords in various product niches.
In my experience, list articles are the backbone of most affiliate blogs.
They are difficult to rank for, and you will often compete with large publications for most of the popular keywords.
However, they are also very lucrative, and by following the tactics described in this article, you will see exactly how you can create successful list blog posts that can often outrank even much more authoritative competitors.
- What to know before writing a list blog post
- How to use this guide
-
List blog post writing process
- Determine the main use case
- Product research, knowledge, and data
- Start a new post
- Placeholder title
- Research the competition
- Choose the items on the list and their specific use case
- Additional research and ideation
- Think about your audience
- Create the header structure
- Write the content
- Place the “Table of contents” widget before first H2 header
- Select the category
- Set the permalink
- Link out to your other content, especially product reviews
- Add images and their alt-tags
- Create graphs, charts, infographics, and illustrations (optional)
- Add some strategic bolds (optional)
- Correct spelling, proofread, and edit
- Read the article one more time as a whole
- Prepare the final title using the keyword and adding some detail or intrigue
- Publish
- Add internal links to your post from other articles on your blog
- Promote the blog post
- Create a video for the blog post
- Summary
What to know before writing a list blog post
There are a few things you should be aware of before diving into this guide.
What is a list blog post
A list blog post, or a listicle, is a type of blog post where several products, ideas, tips, or concepts are described in some level of detail. This can include anything from regular consumer products, like, say, “best 13 tactical wallets”, to more abstract tips and guidelines on how to perform a certain action, like “top 5 tips for keeping your wallet safe from theft”.
This type of post can often look similar to an informational article that simply lists a set of steps needed to be done to perform some action. In fact, the difference there is probably not that important, as long as you give your audience what they’re looking for.
This guide will focus more on list articles for products, but many of the principles will apply when the list items are steps, ideas, or some more abstract concepts.
List blog posts are constantly a work-in-progress
Probably the most important concept you need to understand about list articles is that they’re never really 100% done.
That can be said for any type of content, but list articles will probably be the most subject to frequent changes and updates. As time goes by, new ideas and products will emerge that will replace the old ones, and often even the old ideas and products will change, and it is your job to make sure your content is up to date.
Also, list posts kind of benefit the most from somewhat frequent updates, especially when adding items to the list. Besides new products coming to market all the time, your competitors will keep you on your toes by trying to create bigger and better lists, and updating their own lists to be bigger than yours.
In fact, in many cases, it seems like search engines choose who gets to rank first merely just by looking at the number of items. Of course, it’s not that simple, but it almost looks like that, and that’s why adding items to the list can often be an easy tactic to improve your rankings.
Which brings us to…
Number of items in the list
While we can’t prove exactly how search engines work, the number of items in the list article does seem to play a non-trivial role in how well the article will rank.
It’s not like a totally new blog can just write the biggest list article on a keyword and suddenly outrank everyone else. That will almost certainly never happen.
The number of items in the list may be more like a tiebreaker.
I’ve often had situations where I rank n.1 for a list keyword, and then a competitor with authority similar to mine writes a bigger list article and outranks me, and then I just increase the number of items in my article and I rank n.1 again…
That’s how these articles with 100+ items get created, by the way.
In any case, I’m a big proponent of writing long, detailed guides, so start with a big list anyway, and if a competitor outranks you because their list is bigger, then add more items to your list as well.
List blog posts and the buyer’s journey
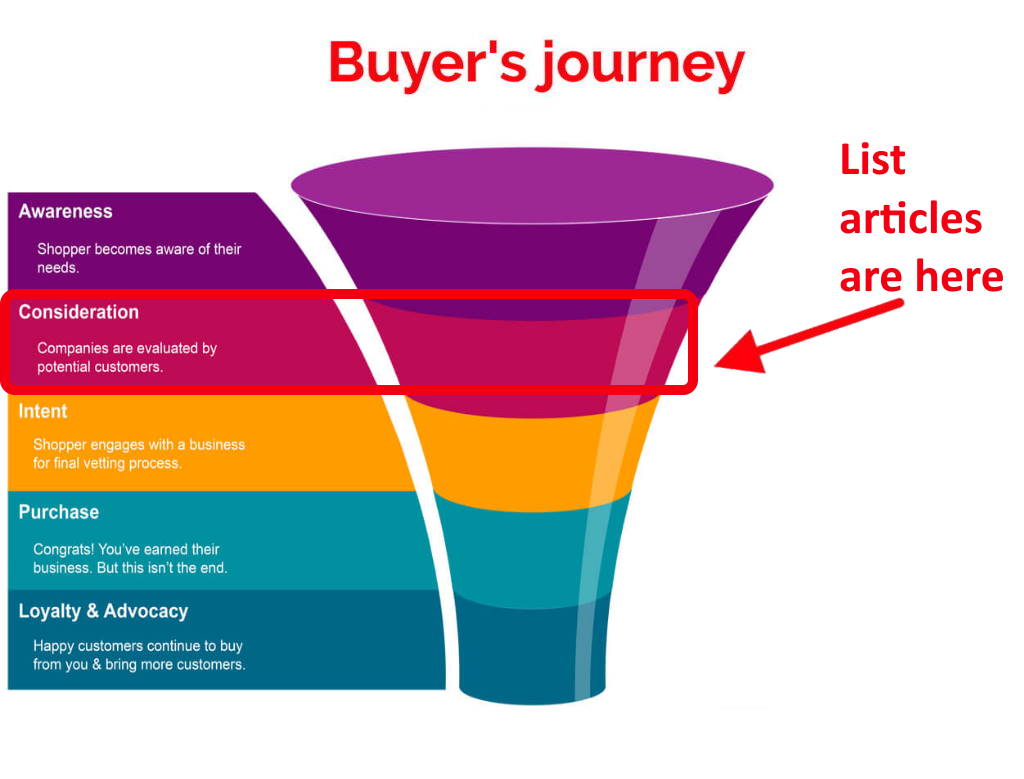
We can’t say with absolute certainty where our audience members are in the buyer’s journey when they are reading a list blog post, but the Consideration phase is the most likely place where they are. People who want to see a list of several different products compared against one another will likely already be aware of the problem they need to solve, but they will still not be sure exactly which product or brand should they choose, and they will want to explore the options from a distance before they narrow down their choices.
Much like product reviews, big and authoritative publications love creating lists of products to recommend to their readers. Even when they don’t really have a lot of experience or expertise in the field, Google and other search engines still choose to reward them the top rankings simply because they consider them to be generally trustworthy.
That’s why ranking list articles is quite difficult.
However, it’s far from impossible.
For starters, big publications often focus on just the “best X products” type of articles, and often don’t even touch the “best X products for Y” articles, mostly because the latter’s keywords have less search volume. Still, they are very lucrative keywords to cover because they are more specific and people searching them are probably even further along in the buyer’s journey. Also, they do require more thought and experience with the products and the niche, which may also be a big reason why big but generalized publications that don’t really specialize in one topic leave them alone.
And, of course, after you’ve done all of the “best X for Y” list articles, and all of the product reviews for each of the entries in the lists, you can finally create a truly detailed, in-depth, general “best X products” article, and add internal links pointing to it from all of your other articles (almost like your entire blog or category pointing to that one article), which will increase the chances of that article ranking by a lot.
How to use this guide
This guide will also be available on my Youtube channel in video form. I would probably recommend this blog post as the better method to learn, as you can navigate different parts of the guide easier and access them separately if needed.
Still, I also recommend going through the video at least one time so that you get a better feel of how the whole process untangles in real time. Plus, you will get a chance to witness me make a ton of mistakes, which is something that’s inevitable in blogging and I believe it is important for you to know that and see another blogger go through it.
This guide is meant for pretty much everyone looking to learn how to write successful list articles, but I believe that beginners will find it the most useful.
To put myself in the shoes of a beginner as much as I can, I will be using examples from a niche I’m not very familiar with, which is the minimalist tactical wallets niche.
I should mention that I’ve already done several product reviews so far on a few different wallets, so I’m not a complete beginner, but the niche and the products are simple enough to not require a lot of research to get the basic concepts down.
Also, the niche is quite easy to relate because everyone has a wallet, or at least understands how wallets work, and the mental transition to the concept of minimalist or tactical wallets will be almost without friction, even if you’re completely unfamiliar with that type of products.
To give you a more practical example of the type of list article I would write in real life, I will not write a list article like “best minimalist wallets”, as that keyword already has a lot of competition on it from very big publications, and a new blog like mine will probably not rank for that keyword anytime soon.
Instead, I will go with a more specific keyword and use case, and write about “best minimalist wallets for lots of cards”. Currently, there is no article for this exact keyword, and chances are, I will rank for it fairly quickly despite having a new blog. The downside here is, of course, that search volume for this keyword will be low, but I’m willing to bet it will not be 0, and writing such an article will be worth it because it will be fairly easy to achieve following my process and yet still bring some results.
As usual, the article that I will be writing as an example will be a live article that will get published on the FutureHowTo blog, which is one of the blogs from the Digital Marketing Empire network.
This guide assumes a general knowledge of the basics of WordPress, as that’s what I use and what I recommend you use as well. If you’re not familiar with WordPress, check out the guide on how to create a blog post in WordPress.
Note to Digital Marketing Empire team members
If you are not a member of the Digital Marketing Empire team, the following section doesn’t apply to you (still, consider joining the team if you’re looking to build a passive income stream for yourself).
If you are a member, then, as you may already know, most of the research will already be done for you, and potentially the header structure, the category selection, and the images in some cases, especially for new members.
Also, we will do a lot of editing together, especially if you’re still in the training phase and are working closely with me or another mentor.
Of course, you will still need to do a lot of research here and get familiar with the products you’re writing about, but after the research you will do on your own, you will likely find that by simply following the process outlined here, the blog post almost writes itself.
List blog post writing process
The following is my detailed, step-by-step blueprint for writing list articles. The process is quite long, but every step is actionable and broken down to the fundamental level, so while it may take a while to get used to it, it’s ultimately a process that’s simple to follow and execute.
This is a list of all the steps involved in the list article writing process:
- determine the main use case
- product research and knowledge
- start a new post
- use the phrase “best [products] for [use case] ” as the initial placeholder title (this will also be the keyword we’re trying to rank for)
- research the competition
- choose the items on the list and their specific use case
- additional research and ideation
- think about your audience
- create the header structure
- create the structure for every entry
- write the content
- fill out every entry
- fill out the rest of the subheaders
- add links for buying for every entry
- add for specifications for every entry
- write the intro paragraph
- write the summary and call to action
- prepare the summary list or table for the Google snippet
- place the “Table of contents” widget before first H2 header
- select the category
- set the permalink
- link out to your other content, especially product reviews
- add images and their alt-tags
- create graphs, charts, infographics, and illustrations (optional)
- add some strategic bolds (optional)
- correct spelling, proofread, and edit
- read the article one more time as a whole
- prepare the final title using the keyword and adding some detail or intrigue
- publish
- add internal links to your post from other articles on your blog
- promote the blog post
- create a video for the blog post
Determine the main use case
As I mentioned before, list articles will typically have a distinction, or a use case, to make them more focused and more appealing to people searching for more exact keywords.
Since the example we will be working with is “best minimalist wallets for lots of cards”, the use case here will be, well, minimalist wallets that can hold a lot of cards, or at least more than the average minimalist wallet can hold.
While at some point you will probably write a list article without a specific main use case, that article is best saved for later in my experience, as the keyword will have more competition, and often times there will be very little you can do to outrank the established websites that already rank for that keyword.
Product research, knowledge, and data
I usually recommend starting to write list blog posts after you’ve done product reviews of the most important or popular products in the niche you’re covering. That way, you will already have a good knowledge of the strengths and weaknesses of each product, and the list article you produce will be well researched and helpful to your readers.
Trying to create a list article of best products for a given use case without having a solid understanding of most of the products previously will result in sub-optimal content that will not only be factually wrong, it will also likely not connect with the readers, and it will perform poorly as a result. In case you don’t have a lot of knowledge about the products in the niche, you can still go ahead and try to do an article of this type, but you will likely spend a lot more time researching the products.
One very useful tool for brainstorming the ideas for the items in your list articles will be the data and specifications spreadsheets you’re creating as you’re writing your product reviews (which is another reason why product reviews should come first). By being able to sort and filter all of the products based on any criteria or parameter you choose, you can easily find suggestions and inspiration for the truly best products for a certain use case.
Start a new post
An inevitable part of any blogging process. Hit the “Add new” button on the Posts page in your WordPress editor, and let’s begin.
Placeholder title
Almost universally, you will write the real, final version of the title after you’ve completed the entire blog post. That goes for any type of article you write.
Still, it feels really weird to write thousands of words, and not have a title for the article.
That’s why I recommend starting with a placeholder title. This initial version of the title will only consist of the keyword itself, but it’s enough to get us going.
Also, I usually prefer starting every word in the title with a capital letter, as it captures the attention of the readers more efficiently.
In our example, the placeholder title will be “Best Minimalist Wallets For Lots Of Cards”.
Research the competition
In pretty much every case, the only data points I want to know about the articles of my competitors are the word counts of their articles, and the numbers of items in their list.
Of course, it’s almost impossible to not see any of the suggestions of the competition while researching their list articles. Still, I encourage you to be influenced by their choices as little as possible.
Make your own choices.
Plus, you will likely find that very few competitors actually use the cross-use-case tactic that I will demonstrate in the next section. Now, this is only a theory of mine, but my experience and intuition strongly suggest to me that using that tactic has been very useful in helping me outrank the competition, often even when the competition is much bigger websites.
In any case, you will take a look at all of the articles on the first page of Google for your keyword (if there are any at all), and take note of the word counts in their articles, as well as the number of items in their lists.
Take the maximums from both of those sets of numbers. Those will be the minimum targets for your own article. Ideally, you will want to create bigger articles in both of the dimensions by at least 20%.
There may be some exceptions to that rule, however. For example, if the maximum number of items out of all the competing list articles is so big that it makes creating a bigger list almost infeasible, then just try to create an article that’s bigger in terms of word count.
For our example, there are no articles that target the exact keyword we will be writing about. That’s both good news and bad news, since we will likely rank for that specific keyword sooner, but there will likely be a lot less search volume for it as well.
To illustrate the example, I will perform the same process but for the keyword “best minimalist wallets”. The biggest competing article, both in terms of the number of items in the list and word count, is an article about 79 minimalist wallets, and around 5800 words. In this case, I would probably decide to create a bigger article in terms of word count, but probably not in terms of items on the list, as 79 is too many items for anyone to go through. What I would do instead is probably have between 15 and 30 items, but describe each in more detail.
Choose the items on the list and their specific use case
This is a very important step in the process, one that may help separate your article from the crowd the most.
Besides finding out the best products for the main use case, you should go a step further and add another use case, or a cross-use-case (I’m coining the term), that the specific product is the best for.
For example, since we are writing about the best minimalist wallets for lots of cards, some ideas for cross-use-cases might be:
- best aluminum minimalist wallet for lots of cards
- best women’s minimalist wallet for lots of cards
- best minimalist wallet for lots of cards under $50
- most durable minimalist wallet for lots of cards
There are many ways you can slice this, and I believe that’s a great thing, since it will speak directly to a person with a very specific need and use case, or at least remind them to think in that direction. I believe this is one edge you will often have over your competitors, as very few of them will perform this action.
Additional research and ideation
The items from the list will represent the bulk of your article, but I’ve found that my list articles rank a lot better when I can include some additional content that’s related to the items in the list.
Now, deciding whether to add more content to the list or not can be tricky, as often times, the additional content may belong to a separate article.
However, some types of content naturally belong in the list article. Usually, there will be several additional headers, each with several paragraphs, that can help the reader make a better decision.
After you’ve Googled your keyword, looking at the related Google searches, the “People also ask” section, and what the Google autosuggest feature provides, are all great ways to find some inspiration for the additional content. I recommend using an incognito window, where the language is set to English, and the region is set to the United States, so that I get results that mimic what my audience will most likely see the most (most of my readers are typically English-speaking people from the US).
In our example, I might include content that looks something like this:
- how to choose the right minimalist wallet for lots of cards
- what is a good price for a minimalist wallet
- how many cards do minimalist wallets fit
Think about your audience
Every single one of my blogging processes includes a step that will require you to take a moment to step back, think about the type of person most likely to read the article, and try to connect with their way of thinking as much as possible.
If you’re an expert on the topic, try and remember what was it like being a beginner. Try to think about what would you like someone to tell you about this type of product when you didn’t know anything. What was important to you, what questions did you have, what concerned you? Remember, we were all beginners once.
Create the header structure
Usually, list articles will follow one of two patterns for their header structure.
The simpler header structure is made up of only H2 subheaders, where every item and its specific use case are the H2 subheader title. That’s super simple, and it works pretty well. Optionally, you can add additional H3 headers for each item. I’ve found that H3 subheaders like “who shouldn’t buy this product” and “who should buy this product” work really well, and you can also add an extra H3 for every item’s specifications if it makes sense.
For our example, the header structure following the first pattern may look something like this:
- Best minimalist wallet for lots of cards overall – (H2)
- Who shouldn’t buy the (H3)
- Who should buy the (H3)
- specifications (H3)
- Best budget minimalist wallet for lots of cards – (H2)
- Who shouldn’t buy the (H3)
- Who should buy the (H3)
- specifications (H3)
- Best premium minimalist wallet for lots of cards – (H2)
- Who shouldn’t buy the (H3)
- Who should buy the (H3)
- specifications (H3)
- Best aluminum minimalist wallet for lots of cards – (H2)
- Who shouldn’t buy the (H3)
- Who should buy the (H3)
- specifications (H3)
- Best titanum minimalist wallet for lots of cards – (H2)
- Who shouldn’t buy the (H3)
- Who should buy the (H3)
- specifications (H3)
- Best carbon fiber minimalist wallet for lots of cards – (H2)
- Who shouldn’t buy the (H3)
- Who should buy the (H3)
- specifications (H3)
- Best leather minimalist wallet for lots of cards – (H2)
- Who shouldn’t buy the (H3)
- Who should buy the (H3)
- specifications (H3)
- Best tactical minimalist wallet for lots of cards – (H2)
- Who shouldn’t buy the (H3)
- Who should buy the (H3)
- specifications (H3)
The second pattern for the header structure works a bit better in my experience. This is the header structure you will use when you can include additional content related to the list article. In this case, you have one most important H2 subheader that is pretty much the keyword of the article itself, with every item and its use case being an H3 subheader under it, and the additional subheaders for every item as H4s. Then, usually at the end of the article, the additional H2 subheaders follow, although some of them can be at the beginning as well in some cases.
In our example, the header structure would look like this:
- Should you buy a minimalist wallet if you have lots of cards?
- Best minimalist wallets for lots of cards (H2)
- Best minimalist wallet for lots of cards overall – (H3)
- Who shouldn’t buy the (H4)
- Who should buy the (H4)
- specifications (H4)
- Best budget minimalist wallet for lots of cards – (H3)
- Who shouldn’t buy the (H4)
- Who should buy the (H4)
- specifications (H4)
- Best premium minimalist wallet for lots of cards – (H3)
- Who shouldn’t buy the (H4)
- Who should buy the (H4)
- specifications (H4)
- Best aluminum minimalist wallet for lots of cards – (H3)
- Who shouldn’t buy the (H4)
- Who should buy the (H4)
- specifications (H4)
- Best titanum minimalist wallet for lots of cards – (H3)
- Who shouldn’t buy the (H4)
- Who should buy the (H4)
- specifications (H4)
- Best carbon fiber minimalist wallet for lots of cards – (H3)
- Who shouldn’t buy the (H4)
- Who should buy the (H4)
- specifications (H4)
- Best leather minimalist wallet for lots of cards – (H3)
- Who shouldn’t buy the (H4)
- Who should buy the (H4)
- specifications (H4)
- Best tactical minimalist wallet for lots of cards – (H3)
- Who shouldn’t buy the (H4)
- Who should buy the (H4)
- specifications (H4)
- Best minimalist wallet for lots of cards overall – (H3)
- How many cards can minimalist wallets fit? (H2)
- How to choose the right minimalist wallet for lots of cards? (H2)
- What is a good price for a minimalist wallet? (H2)
For our example, we will use the second header structure, as it will almost universally perform better.
Create the structure for every entry
Besides the header structure, I also like to use a small list of several points that I will try to expand upon for every item on the list. The contents of this small list will depend on the type of product we’re describing, and we practically copy the whole thing into every product’s entry.
For this example, the entry structure will look like this:
- style of the wallet
- design
- build quality and materials
- size and weight
- capacity
- tactical features
- price and value for money
- reviews and user satisfaction
Each of these points will get a single paragraph with a few sentences.
Write the content
If you’ve followed the process and you’ve done everything right so far, writing the content itself will be very easy. As they say, well planned is half done, and that’s pretty much 100% true for this process.
The process is so broken down and detailed, that all that remains for you to do is create a few sentences for every subheader.
As usual, the general recommendations for writing high-quality blog posts apply:
- think as if you’re talking to someone you kind of know and they’ve asked you to recommend them a good product for their problem
- use a friendly but still somewhat professional and semi-official tone
- use the language and vocabulary of the niche, but avoid too much jargon and make the language beginner-friendly
- inform, educate, explain, inform, give your opinions and friendly recommendations
- don’t judge, and try not to use offensive language (but still express your opinions clearly and confidently)
- don’t lie
- use both your own experience and authority of other experts in the niche
- be specific
- be confident and determined
- avoid filler words, slang, and cursing
- don’t force humor, but go with it if it happens naturally
- avoid sarcasm, affiliate blogs are not a good place for it
- use short, clear sentences, and break long sentences into shorter ones (probably the most important point!)
- use commas liberally
- use short paragraphs, try not to have paragraphs with more than 5-6 sentences (even one sentence is a good paragraph sometimes)
- avoid long, fancy, and complicated words, especially when you can use simpler alternatives
- cut out words, sentences, and parts that are not necessary
If you get stuck (which will probably happen very rarely), simply take a look at an image or a video of the product where you are stuck, and see what your brain generates on the spot for the specific part you want to write about.
Fill out every entry
The bulk of writing a list article will consist of taking the points from the entry structure for every item, and turning them into a few sentences. I really don’t think it can get any easier than this.
As I said, every point will become a short paragraph, with anywhere between one and six sentences, but usually two or three. The same will apply to the other smaller subheaders, like the “who shouldn’t buy” and “who should buy” ones.
You will find that you have created quite a lot of content after you’ve finished this step, and the majority of your writing will mostly be done.
I can’t really show you this step in this guide, but the Youtube video accompanying this guide does exactly that – you will see me write every single sentence in the article. For some reason, I believe that was exactly what I was missing when I first learned to blog, and even though the guide will be quite long, it might be helpful to someone that has the same problems I had.
Of course, use Grammarly for the entire time while writing.
Fill out the rest of the subheaders
Once you’re done with every entry, you only need to finish the rest of the subheaders in the list article, if any.
Again, that’s gonna involve just a few paragraphs for each, usually answering questions or giving some extra advice. In the case of the “who shouldn’t buy” and “who should buy” subheaders, you will simply give the best, honest advice for who should truly buy this product and who should look at something else.
Add links for buying for every entry
Speaking of the “who should buy” subheaders, they will of course include affiliate links to the products you recommend. A very simple step, but a crucial one.
Add for specifications for every entry
For a lot of different types of products, it will make sense for the section to include the specifications of the product. Simply add a list or a table that shows all of the specifications about the product that you can find.
Write the intro paragraph
The first paragraph is probably the most important paragraph in every article. Besides the title, it is the only other piece of text from your article that probably most people will read, and based on its quality, they will decide whether or not to continue reading.
A lot of weight rests on this tiny piece of text’s shoulders.
Which is why it is critical to not mess it up.
And while it may be tempting to try and make it 100% perfect, I usually advise beginners to just not mess it up first, and worry about making it great as they become better at writing and copywriting.
The reason why I recommend writing the first paragraph last, or after you’ve completed most of your article, is so that you have a better understanding of the problem discussed and be able to come up with something with more authority.
One very simple formula for making sure your first paragraph doesn’t suck and doesn’t turn away readers is the problem + connect + keyword formula.
The formula literally tells you how to craft a simple yet effective first paragraph:
- state the problem that will be discussed in the article
- connect with your audience by stating your experience or history with the problem
- try and use the keyword if possible without forcing it
Do those three things, and you will have an intro paragraph that’s probably better than 80% of intro paragraphs out there.
For this example, the first paragraph will be:
“If you like the idea of a minimalist wallet, but you still must carry at least around a dozen cards, then you will probably find your perfect minimalist pick in this guide.”
Write the summary and call to action
Another piece of text that’s best written last is, well, the last part of the article (not so surprising as the previous item probably).
End your article with a brief summary of what has been discussed, and a sentence or two that will transition them to the last element of the article, which is the next item on this list.
Prepare the summary list or table for the Google snippet
Google will often display lists or tables as featured snippets for keywords that are about several items or concepts. Also, featured snippets can often go to lower-authority websites. Those two facts can benefit new and lower-authority blogs massively.
That’s why it’s a very good idea to have a short table with every item from the list along with its use case under the first H2 header. That helps Google identify the table easier and consider using it for the featured snipper.
The reason why a table will usually be superior to a list is simply that a table is a more powerful way to convey information than a list, and I believe that Google’s algorithm is getting aware of that. A lot of times, I’ve captured the featured snippet with a detailed table, even when the previous winner of the snippet has been a list.
At the very least, use a table with three columns: the name of the product, its use case, and an affiliate link where the readers can find the product with an anchor text that just says “buy”. For more complex products, you can include other important dimensions and specs of the products as different columns, as well as their prices.
Use the same table in the summary of the article as well. See the table in the live article for the example.
Place the “Table of contents” widget before first H2 header
This is part of my standard procedure for pretty much every type of article I write. Use the LuckyWP Table of contents plugin, and add the table of contents element before the first H2 header.
Select the category
One simple but important step is to choose the right categories for your blog post.
Creating the proper category structure can be an entirely different article. For now, I would only advise you to use a hierarchical category structure, and select all of the categories that make sense for the guide, both main categories and the subcategories.
In our example, those categories will be:
Set the permalink
Judging from both my personal experience and what I’ve learned from the digital marketers that I trust the most, the permalink for the article should simply be the keyword you’re trying to rank for, where the spaces between the words are replaced with hyphens. Simple as that.
Link out to your other content, especially product reviews
As a simple rule of thumb, your list articles shouldn’t really link out to that many places other than the affiliate links themselves, and your own product reviews.
In general, you will link out to every one of your product reviews from the respective item entry for maximal topical relevance. You can either use the product’s name from within the text, or end the entry with something like “see my detailed review of product X to find out more”, where the “review of product X” is the anchor text.
Btw, the product review articles will also link out to your list article, which will also help your blog build a lot of topical relevance.
The default minimum for images is to have an image for every item right under its subheader, and one main image for the article that will also be a product image from the best item (but not the same one as the one used under its subheader).
Also, the main image will be the featured image for the article as well.
The best option for product images by far is images you take on your own. Nothing will beat the authenticity of this option.
However, this may not always be possible, as you may not have access to all of the products you’re writing about. In that case, I recommend one of the following options:
- talk to your affiliate managers and ask them for product images (preferrably from the product being used or in some natural context)
- go on social media, search for the product, and ask the owners of the images for permission to use them in your article and credit them as the source
Create graphs, charts, infographics, and illustrations (optional)
Besides the product images, another great way to give your content some edge is to add additional images in the form of graphs, charts, infographics, or some cool illustration.
In the case of list articles, especially when you compare several items against one another, an image of a chart or a graph that compares some important dimension of the products is an excellent idea that will definitely set you apart from the competition. This is not a mandatory step, but definitely worth it if you’re looking to go the extra mile for your audience.
Add some strategic bolds (optional)
In general, you don’t really have to add extra formatting to your articles.
However, I believe it helps readers if you emphasize a few sentences every now and then to draw their attention to the most important concepts, as long as you don’t overdo it.
If you want to do this but have no idea where to start, you can try boldening the use cases of every product.
Correct spelling, proofread, and edit
When you’re done with the writing, go through the entire article and hunt down the spelling and grammar errors. Grammarly is amazing for this task and will be very helpful, although keep in mind it won’t have the correct suggestions 100% of the time.
Besides grammar, also see if you can improve the language, make it simpler, easier to read, or more engaging if possible.
Also, look for possible factual or logical errors. You will probably not find many of these, but still, keep your eyes open for this anyways.
I can’t show the editing process for the example article here, but you can see how it looks in real time in the video.
Read the article one more time as a whole
After editing the article, you are almost done with the writing, and in fact, you can easily call it a day if you want.
Still, I suggest going through the article one more time. You can do this more quickly, and not as attentive as while editing, just go through it to get a general sense for the “feel” of the article. You want to confirm that your content piece is coherent, intelligent, useful, and flows nicely.
In most cases, you will not have to make any additional adjustments here. Plus, reading the article one more time will help you prepare for the final step.
Prepare the final title using the keyword and adding some detail or intrigue
The last step of the process for list blog posts (and any type of blog post in general) is to craft the perfect title.
We already have the keyword as the initial draft, and now we need to expand on it based on what we’ve written in the article.
The simplest way to get a great result here is to add either some intrigue to the title, or add some extra details.
It’s also a good idea to use either a hyphen or brackets in the title as well, as it seems like using those increases the clickthrough rate.
And, of course, don’t forget to include the number of items in the title as well.
If you can’t think of anything, use a variant of my go-to title enhancer, which is simply “[For Every Budget And Use Case]”.
In our case, we will go with the following title:
“Best Minimalist Wallets For Many Cards – 7 Best Picks For Your Every Use Case”
Publish
Finally, the moment we’ve all been waiting for.
Hit the “Publish” button. You’ve earned it.
Add internal links to your post from other articles on your blog
Once your article is live, you can add links to it from your other published articles. This will not only help your newly published article get indexed and rank faster, but it will also increase the overall topical authority of your blog.
Remember, you must only add relevant links!
You can sometimes change some pieces of text in your existing articles and add some extra context so that the link to your new list article makes sense, but in general, don’t try to force links from articles that are completely unrelated.
Usually, you will be able to easily add links to your list article from all of the product review articles about products mentioned in the list.
Promote the blog post
Promoting your blog posts is an entirely different topic that’s got very little to do with the writing and creating of it.
Still, I like to add several short steps to the actual writing process that don’t really make a lot of difference on their own, but scale well over time and have a small but compounding effect.
After publishing, share your article on all of your social media channels, publish it in some online communities (especially if there are threads asking for a solution that your article provides), maybe do a small shotgun skyscraper and outreach campaign, and send an email campaign to your email subscribers.
Create a video for the blog post
A Youtube channel will almost certainly be essential to the success of your blog, and this will become more and more true as time goes by.
Since this is an entirely different topic, we will not cover it here, and I will publish a separate guide on it soon.
Summary
That was my process for creating list blog posts that rank well on Google, have a strong chance of beating the competition (including higher-authority websites), and will earn you a lot of money over the long run.
I believe that this process is so detailed, down to the level of atomic steps. Honestly, I’ve never seen a process go in this much depth, not even paid blogging courses do this, and I hope this will be useful to you (I certainly wish this type of guide was available back when I was first learning how to blog). Feel free to come back to this process whenever you need to, and check out the video form of it as well.
If you wish to gain full mastery over this process (as well as the processes for the other blog posts), and join me and dozens of other bloggers on the journey of building passive income streams online, then I recommend applying to join the Digital Marketing Empire team.