Today, we will go through the exact steps of building a fully-functional, profit-ready online business for the total price of just $9.
The whole process should take about one hour.
The reason why such a ridiculously low price is possible to achieve is because we will use a lot of tricks and hacks.
The only money spent on building this business will be on the domain name. I am not yet aware of a way to get a domain name for free.
We can get everything else for free. Often, solutions will be provided by services so amazing, that they beat many of their competitors which charge serious money for the same or worse deals.
Given the current situation with the pandemic and COVID-19, people started spending much more time online. As a result, a lot more people have started thinking about finally starting their online business. This guide is the lowest-risk guide of this type on the planet, and you will end up with a fully developed online business that can earn you some extra income in these uncertain times.
While we will have to go a bit low-level for some things, there will no coding knowledge required (just some simple copy and pasting). If you precisely follow along the steps outlined here to the letter, you will have no issues in launching your business in just a few hours.
Make no mistake – despite the shoestring budget, this will be a tangible business that can earn you money. Some things will be done the harder way, but that’s fair given that we’ll have a passive online business for just $9. We will take full advantage of our strengths – we will turn low budget into clean and simple design and tons of value for our target audience.
In fact, even though this business will only cost $9, we will still build something that is much, much higher-quality than a big part of the rest of the Internet. And nobody will be able to tell we’ve only spent $9.
We will show how to build a primarily digital business here. It will earn you money through affiliate marketing, ads, ebooks, digital product sales, or other creative processes. It will not be a code-heavy business like a SAAS, or something that requires a lot of custom software or offline infrastructure, like an ecommerce business for example. If your plan is to build that kind of a business, this is a great starting point, but not more than that.
This practice is best used as a proof-of-concept, a prototype, an MVP, a first version. Upgrading and scaling this business will not be difficult when the need arises.
For the purposes of this tutorial, I will be doing a real-world example following the steps I describe here, and you can take a look at the final result after we’re done. I will be practicing what I preach.
I am an affiliate for some of the products recommended here, and I will earn a percentage if you buy through my links. That will be of no additional cost to you.
If you find this guide valuable, I would really appreciate you sharing it. Years of experience and weeks of work have gone into it, so I hope it brings you value and teaches you how to take action towards your goals in a very resourceful way.
Now, let’s get down to business and build something cool.
What is your business?
While you need to think hard about what you invest your time in, I’d urge you to try a different approach here and ebb on the side of taking action first. Practice beats theory any day of the week.
If you’re reading this guide, chances are you already have an online business idea or two that you’re thinking about starting but have been procrastinating.
Simply trust your gut and go with that idea. If you’ve been considering it for a while, it’s probably better than your other ideas, or what you’ll come up with on the spot. Plus, for the investment of $9 and a few hours of your time, you will finally set your plans in motion, and even see how they progress in the real world.
If you don’t have any ideas at hand, think about these three things:
- What are you at least somewhat good at
- What interests you
- What you believe has a reasonable market demand
The point is not to obsess over this, and see the benefits of taking urgent, focused action. By jumping into action and learning as you go, you will gather so much experience so quickly that you will regret not starting way sooner.
Domain name
This is the only expense that cannot be avoided.
Sure, we can use a free domain WordPress domain, but that is such a poor branding practice, that nobody will actually take that website seriously and as a real business.
Plus, for the price of one drink or a fancy coffee, it is a worthwhile investment.
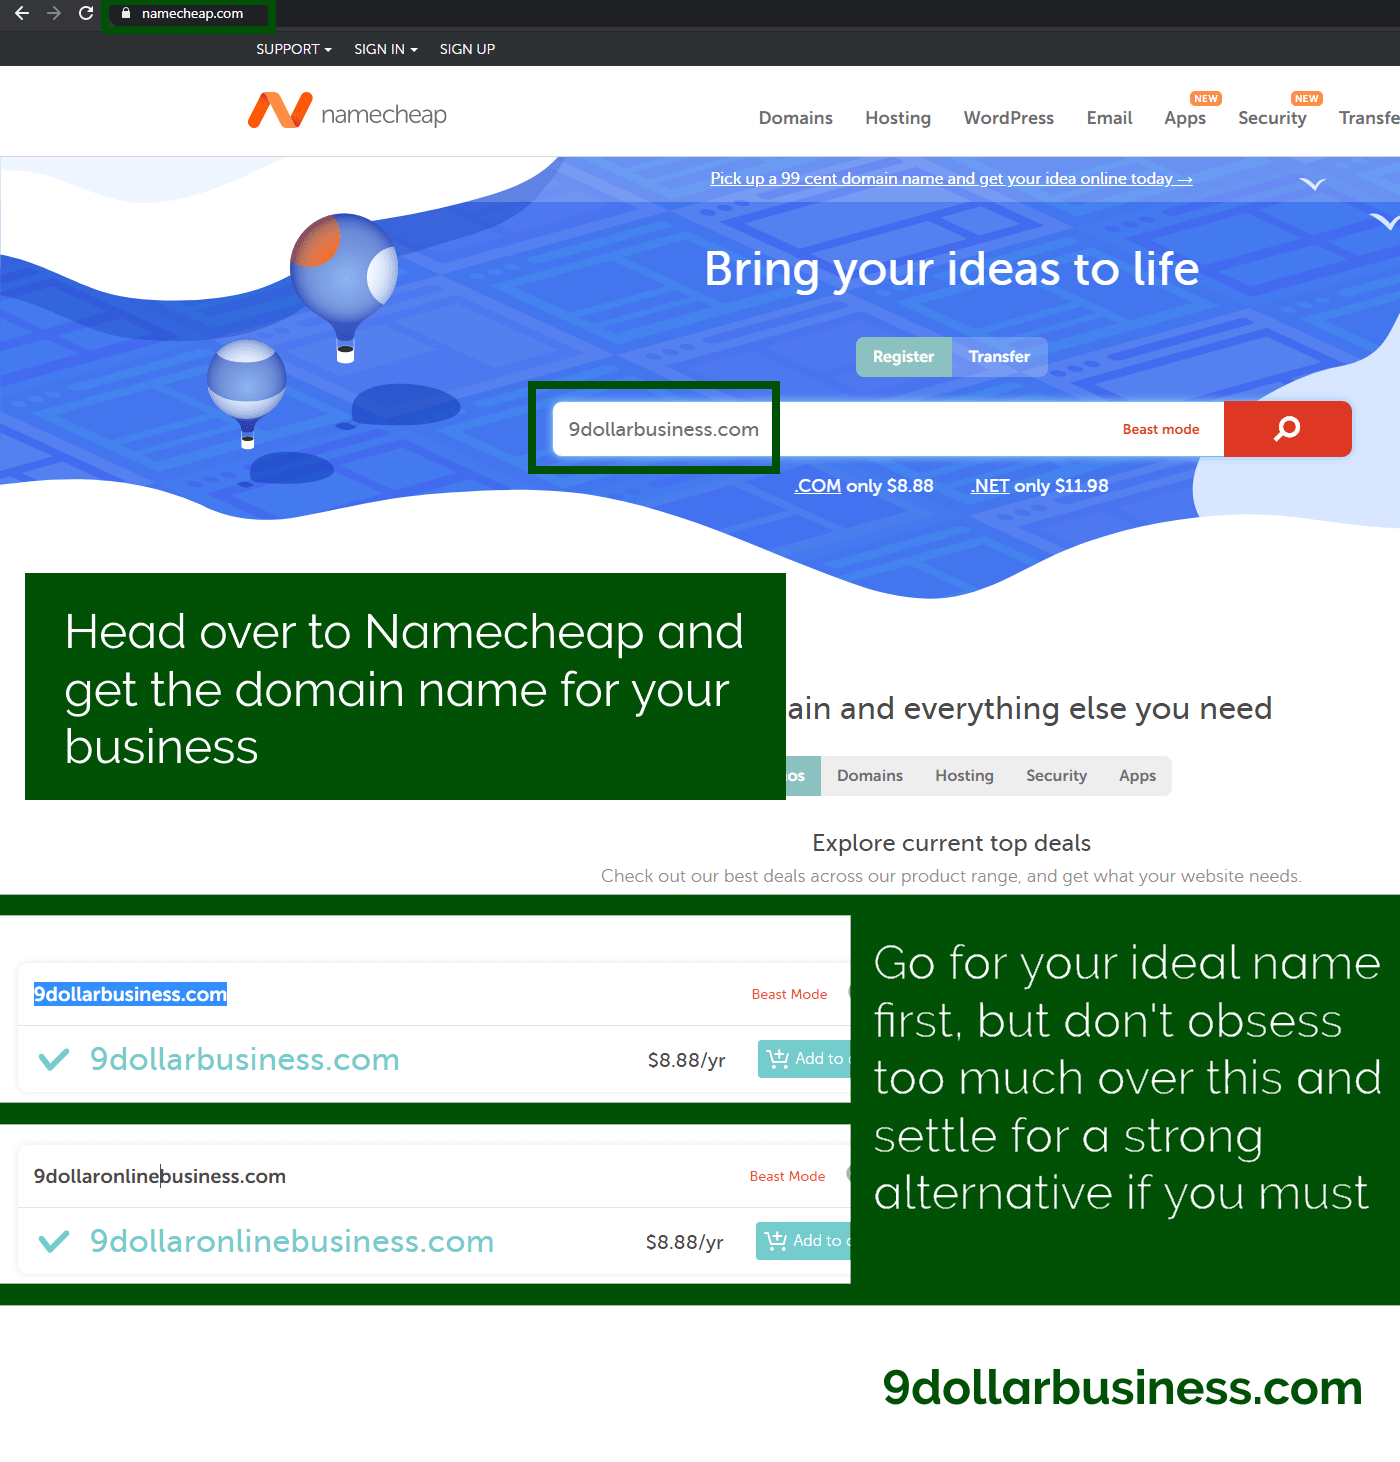
The best place to get a domain from by far is Namecheap. They’re simply the best, unrivaled support and ease of use, and yet the cheapest price. I’ve been using them for years now, and transferred all of my old GoDaddy domains there.
Head over to Namecheap and get the domain name for your business.
- Always pick a .com domain, even if it has to be something longer. It is the default and people always assume it, explaining it is a death penalty for a new business.
- Don’t use dashes.
- Go for the shortest thing possible that includes one or two words related to your business.
- Spend some time picking a good domain name, but don’t get stuck here. If you have one or two ok candidates after 15 minutes, go with that.
For the purposes of this tutorial, I tried 9dollarbusiness.com. It was available, but even if it wasn’t, something like 9dollaronlinebusiness.com would have been, which is also good enough.
Go on and buy the domain, the total price should be around $9.06. If you don’t have a Namecheap account, create one.
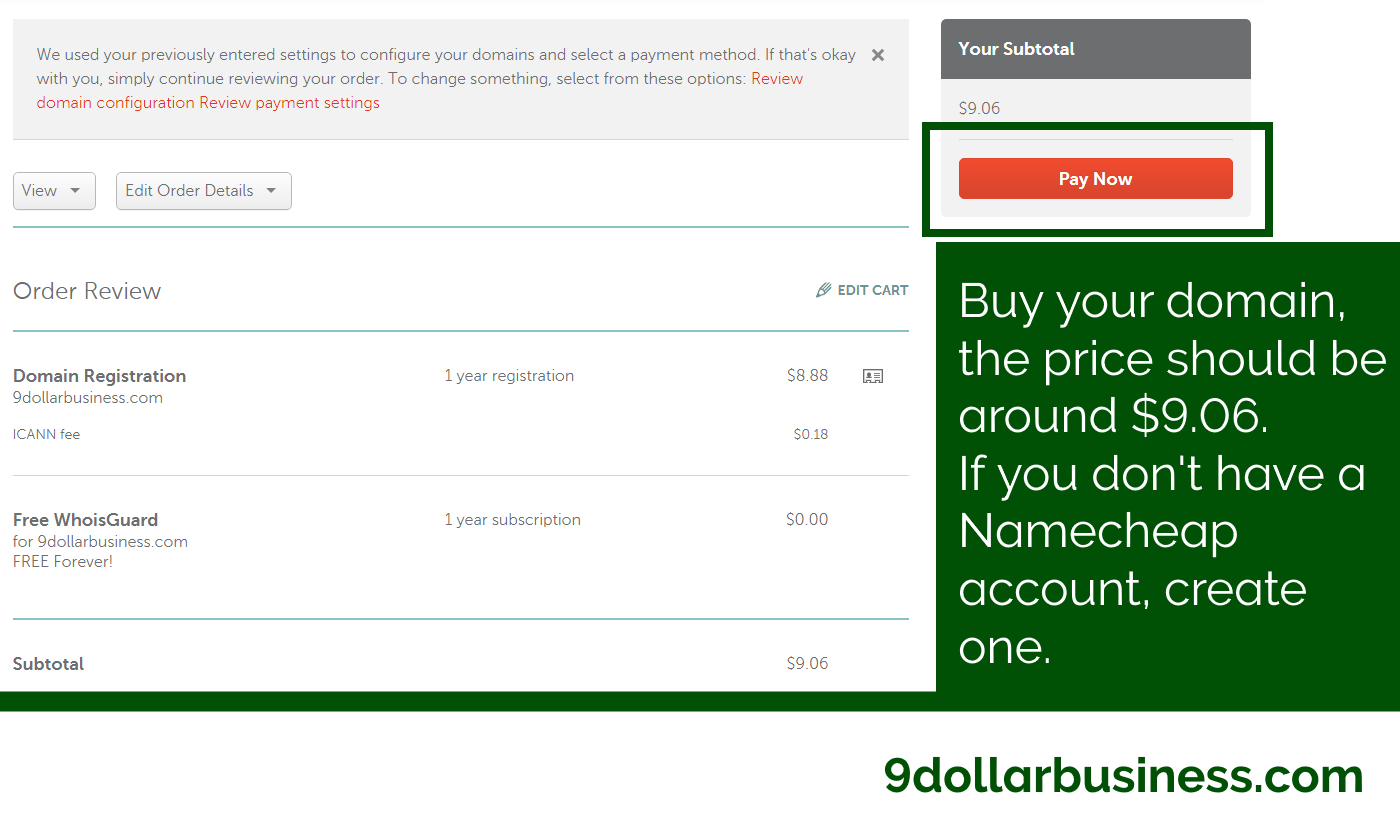
Since this is a $9 guide, you can choose to not spend a dime more and you’ll have a fully-operating business by the end of this tutorial. We will see how to avoid paying for hosting, email automation and other common expenses, which is what I consider the biggest value of this guide.
However, I feel like I should let you know that Namecheap offers a really cheap, surprisingly good hosting solution with their EasyWP plan. I’d say the biggest weakness of this guide is that we won’t be using WordPress yet. While that’s perfectly fine for starting out, it will be tricky to scale and eventually you’ll have to get WordPress. So, it’s something you should be aware of.
Currently, EasyWP is priced at $1 for the first month and $3.88 for each next month, so that’s a great way to test-drive it. The yearly plan is possibly the best hosting deal in the world right now, you will get a fully-managed and hosted WordPress website for something like $22 a year.
That is insane value, and in the spirit of this guide.
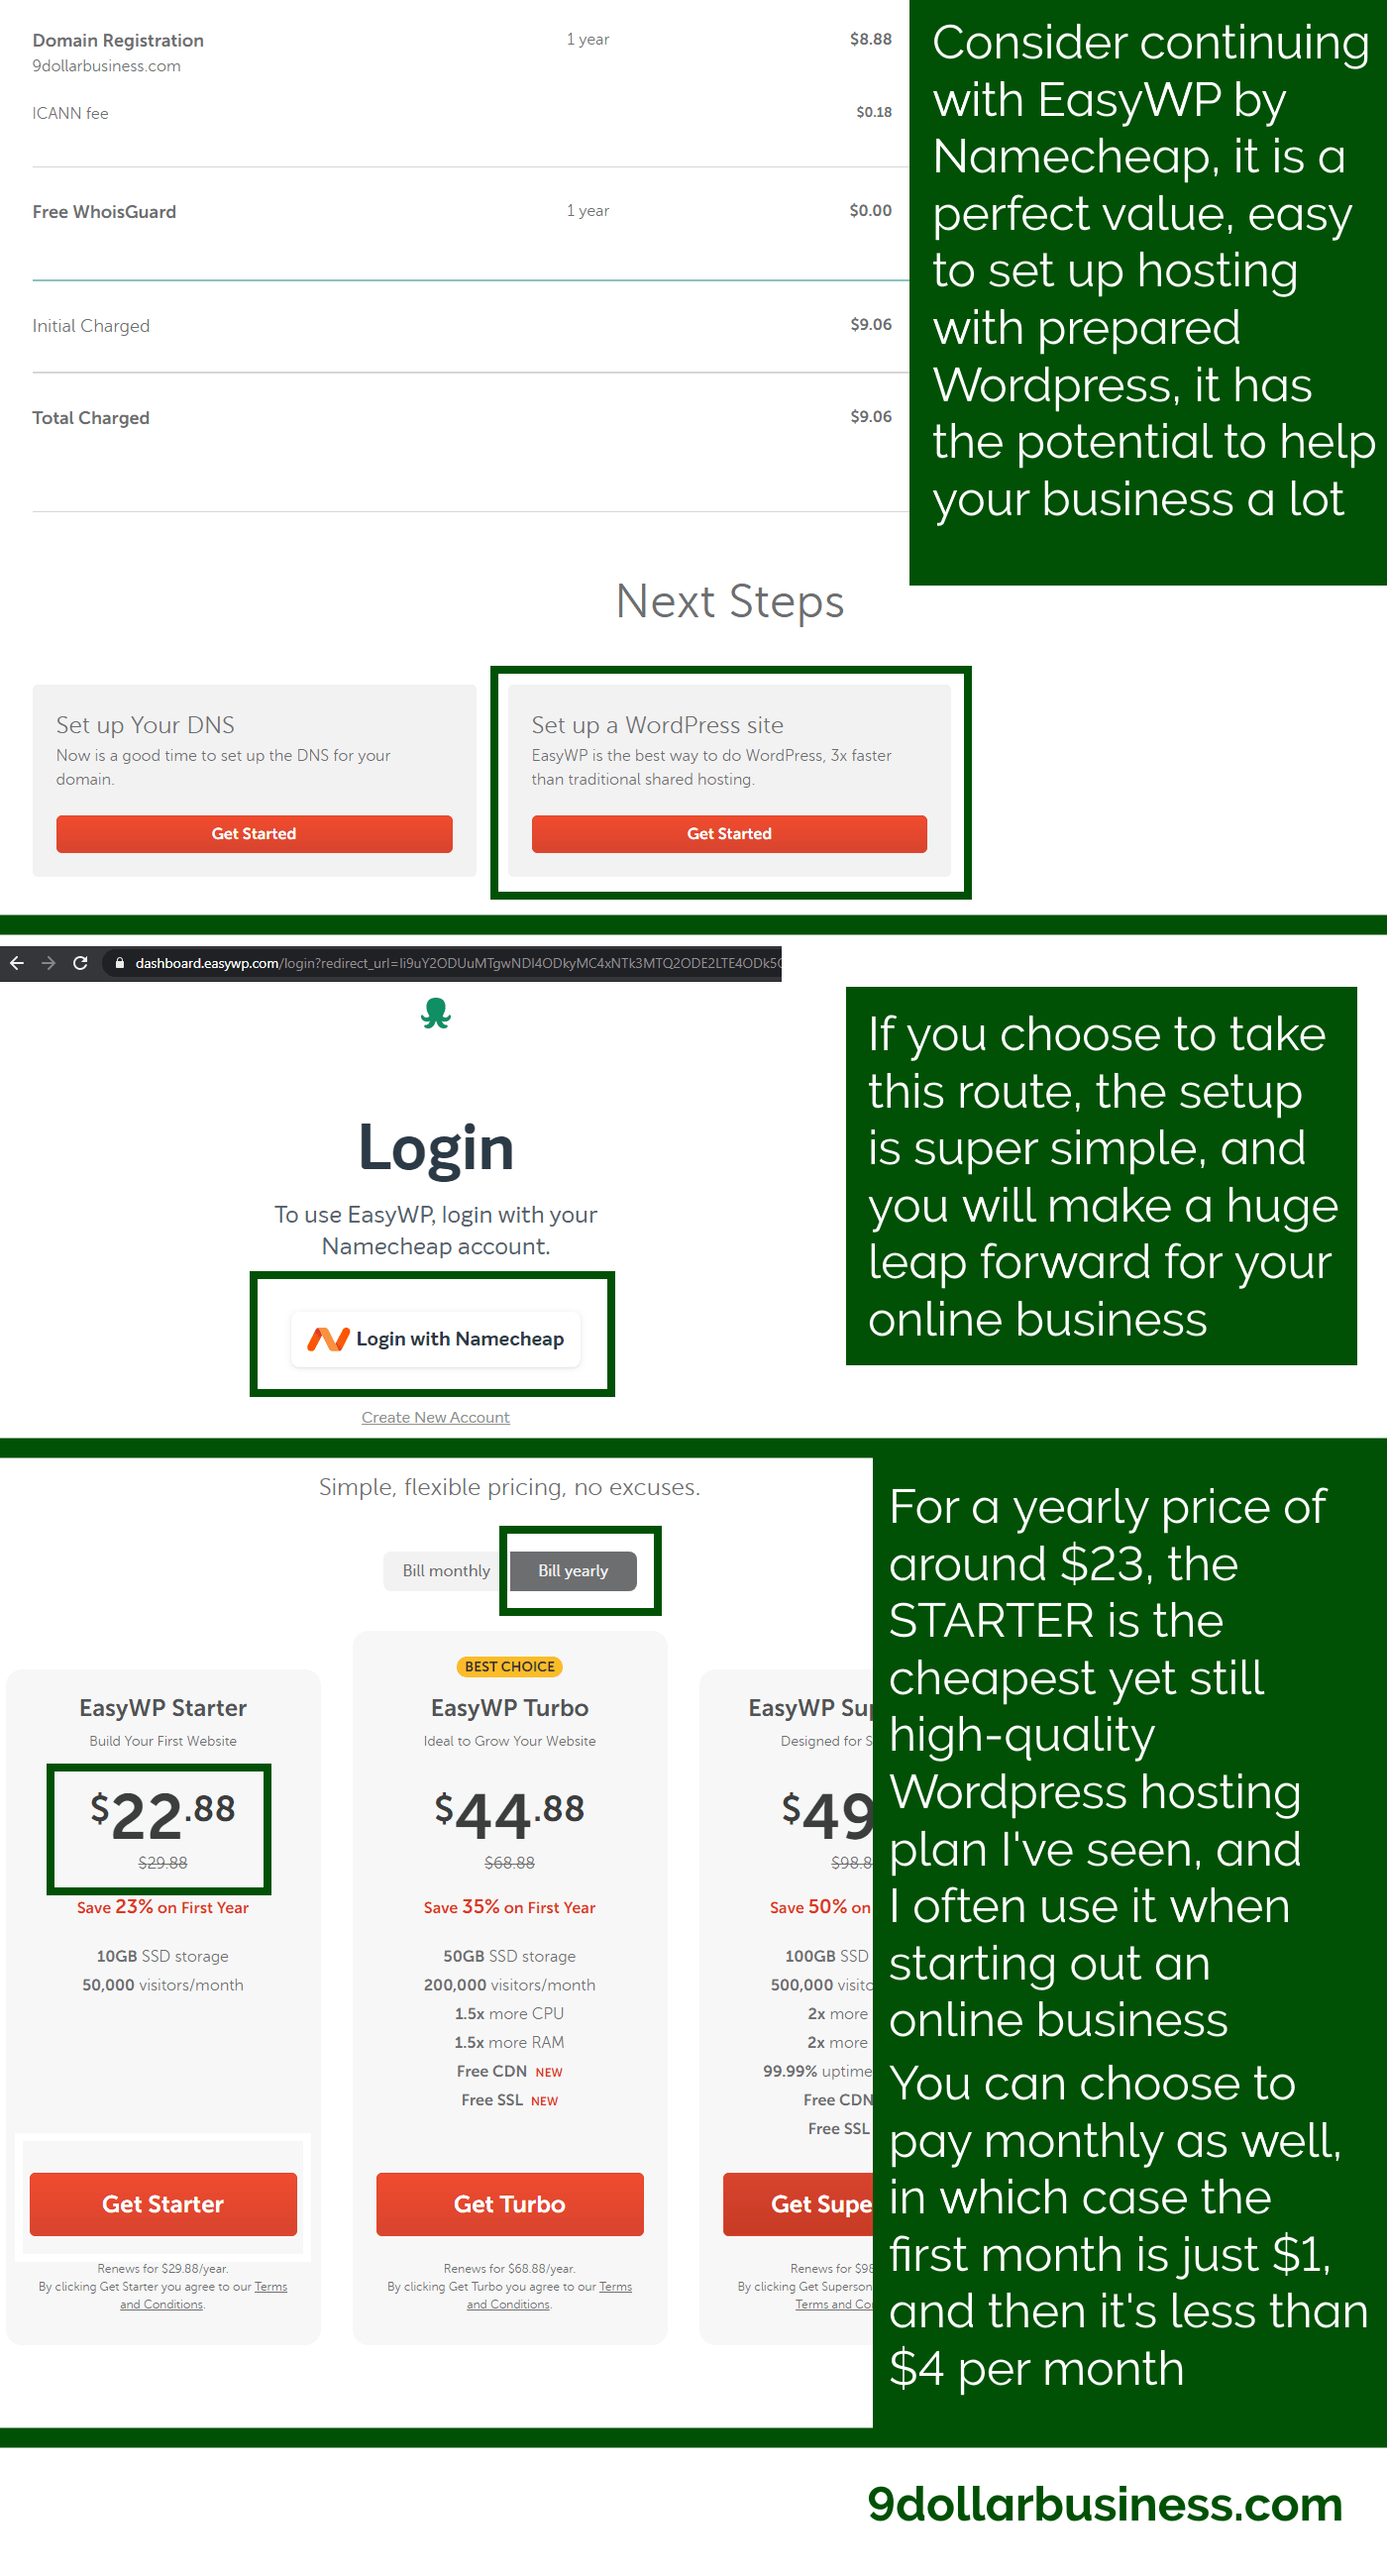
So if you want to jump a few steps and avoid having to move your pages to WordPress later, you can go with that option. I’ve also used it for some projects of mine, and I can guarantee that the value you will get is amazing.
Anyway, back to the original plan. If you want to build your business exactly for just $9, here’s what to do next.
DNS, CDN and SSL
A CDN (Content Delivery Network) is an inevitable part of any modern website. It’s simply a network of servers that keep your images and other files and deliver them to your users faster. They will reduce the load of your servers, but can also prevent DDOS attacks, and provide you with a free SSL certificate.
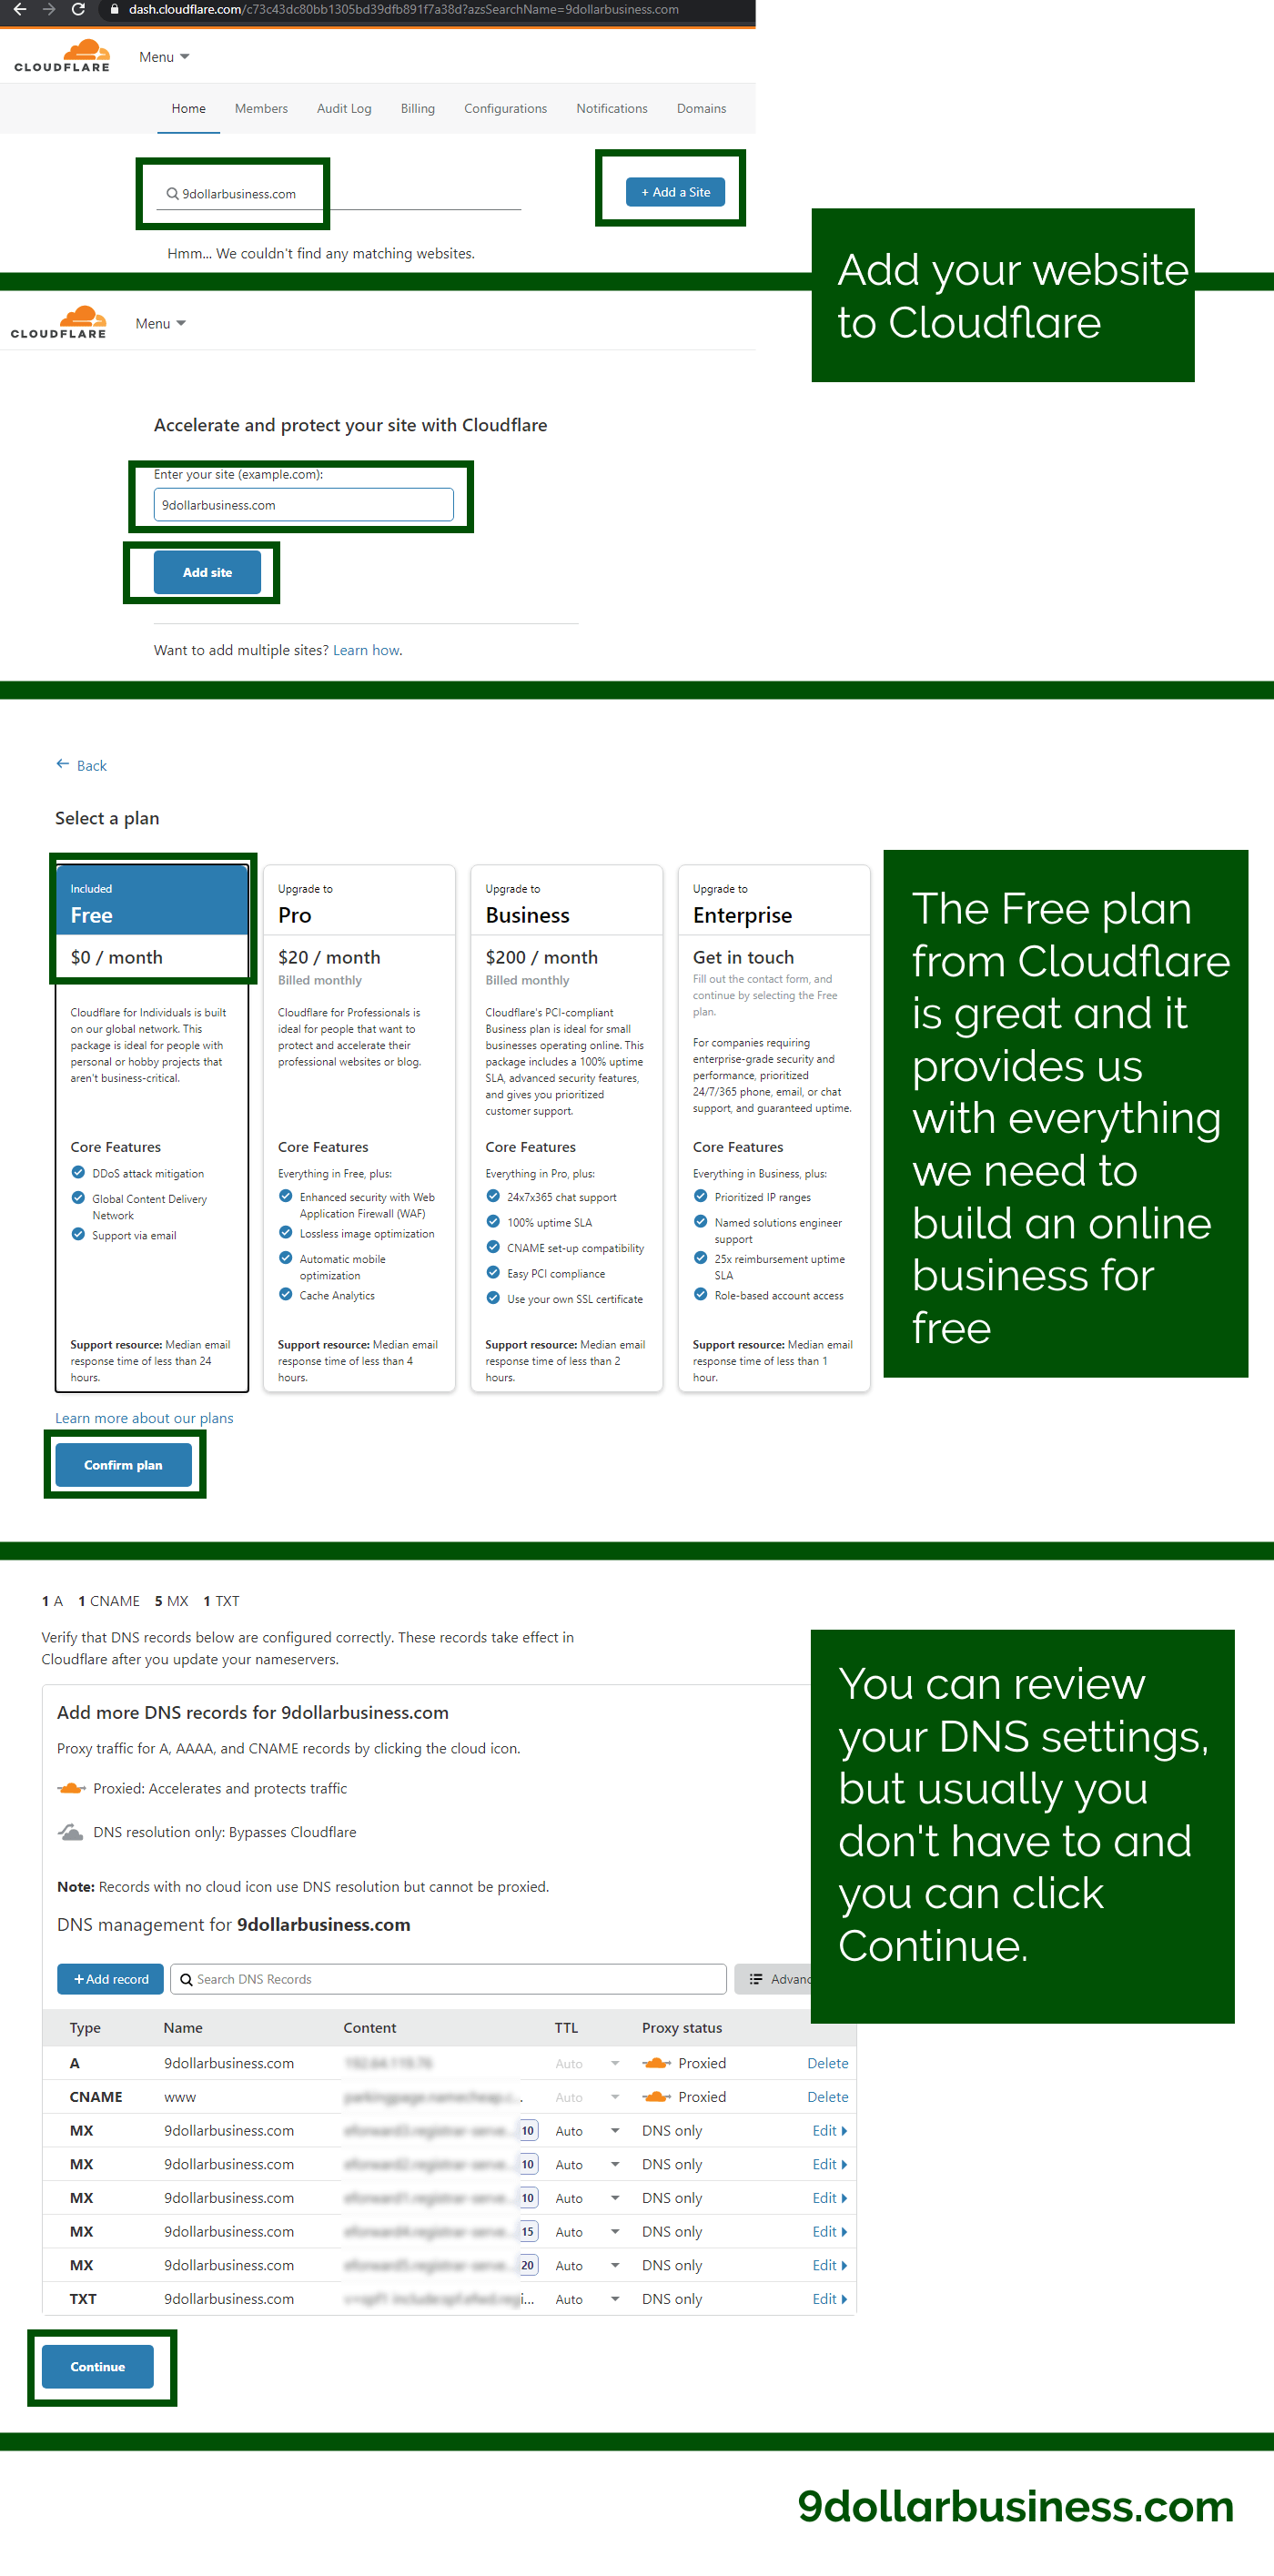
The best thing? There is a way to get all of that for free. Naturally, we’re talking about Cloudflare.
Go to Cloudflare and register an account, or log in if you have one.
Add your website. Select the free plan.
You can review your DNS settings, but usually you don’t have to and can click Continue.
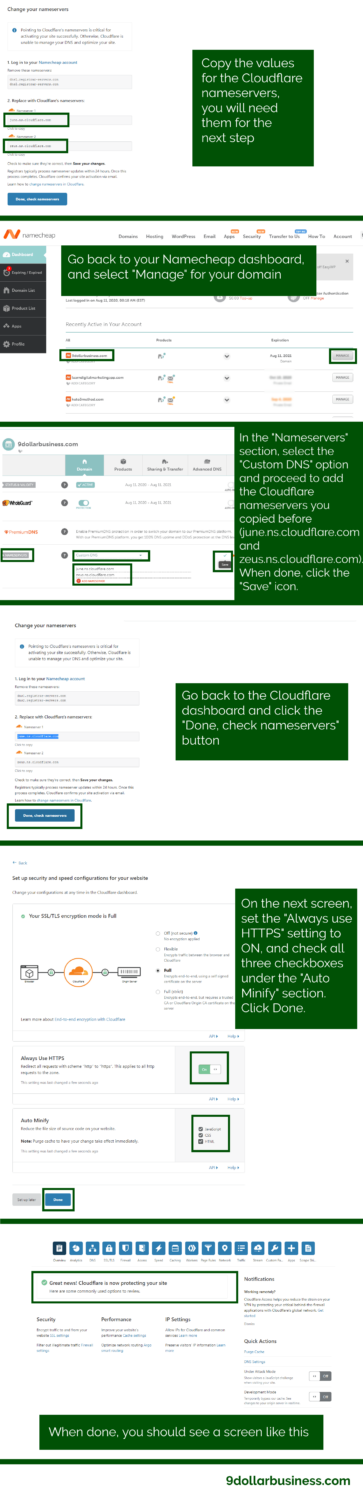
The next screen basically tells you what to do.
- Go back to the Namecheap dashboard.
- In the domain list, click the Manage button on your domain.
- In the Nameservers dropdown menu, select Custom DNS.
- Enter the Cloudflare nameservers (june.ns.cloudflare.com and zeus.ns.cloudflare.com)
- Click on the green Save tick icon.
- Go back to Cloudflare and click the “Done, check nameservers” button.
- On the next screen, set the “Always use HTTPS” to On
- Select all the options under “Auto Minify” (JavaScript, CSS, HTML)
- Click “Done”.
Ok, this can be the boring part where we have to wait.
I must say that I’ve been using Cloudflare for quite a while now, and they have really reduced the time it takes to verify the nameserver updates. While they say this can take up to 24 hours, it can often get done in a few minutes. When this happens, you will get an email, and your Cloudflare dashboard will be ready.
In any case, while we wait for this, we can take care of the other things.
Hosting
This is the magic sauce of this guide, and what inspired me to create it.
I was always curious about whether it’s possible to build a branded business, on your own personal domain and with an SSL certificate, for free.
While I haven’t found a way to bypass the domain name cost, the hosting cost can be fully avoided, and that’s actually the bulk of the cost for an online business! Also, there are some ways to get everything else for free but not the SSL certificate, and that’s not only bad for security and ranking in Google, but is also poor branding.
The best part is, we will be using one of the biggest, most trusted companies in the world for this – Google!
Google are the only company that I know of at the moment that lets you host your own domain, with an SSL certificate, on very good servers and ready for fairly big traffic, totally free of cost.
We will be using Google Firebase.
Sign in with your Google account, or create one if you don’t have one yet. Then:
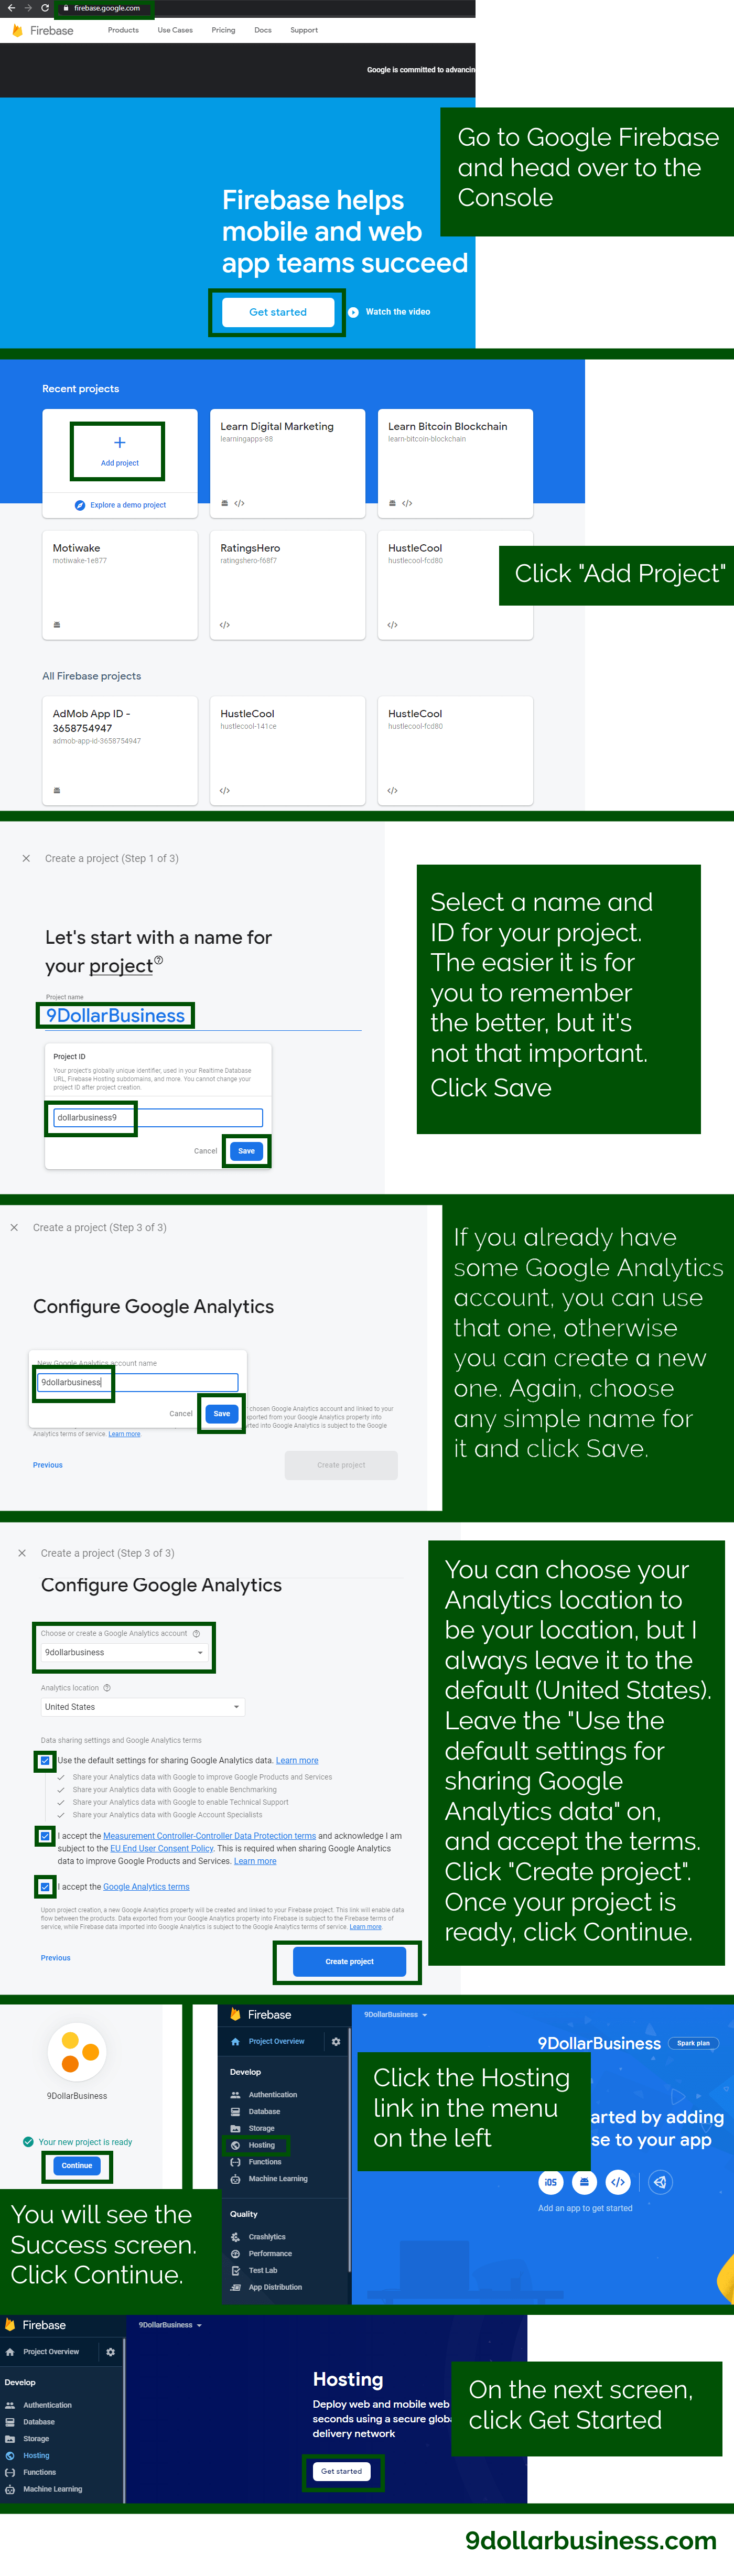
- head over to the Firebase Console
- Click Add Project
- Select a name and ID for your project. The easier it is for you to remember, the better, but it’s not that important really.
- Click Save and then Continue.
- Leave the “Enable Google Analytics for this project” toggle on, and click continue.
- On the next screen, if you already have some Google Analytics account, you can use that one, otherwise you can create a new one. Again, choose any simple name for it and click Save.
- You can choose your Analytics location to be your location, but I always leave it to the default (United States). Leave the “Use the default settings for sharing Google Analytics data” on, and accept the terms. Click “Create project”. Once your project is ready, click Continue.
- You will arrive at the Firebase dashboard. Click the Hosting link in the left side menu, and then click Get Started.
Now it’s time to set up Firebase hosting.
Firebase on your computer
Ok, remember the “little coding” part from above? Well, this is it. If you haven’t done any coding before, don’t be scared, it is just a few very easy steps. Just follow this guide and you will have no issues at all.
If you know what NPM is and you have installed on your computer, great. If not, don’t worry too much about it, just do this:
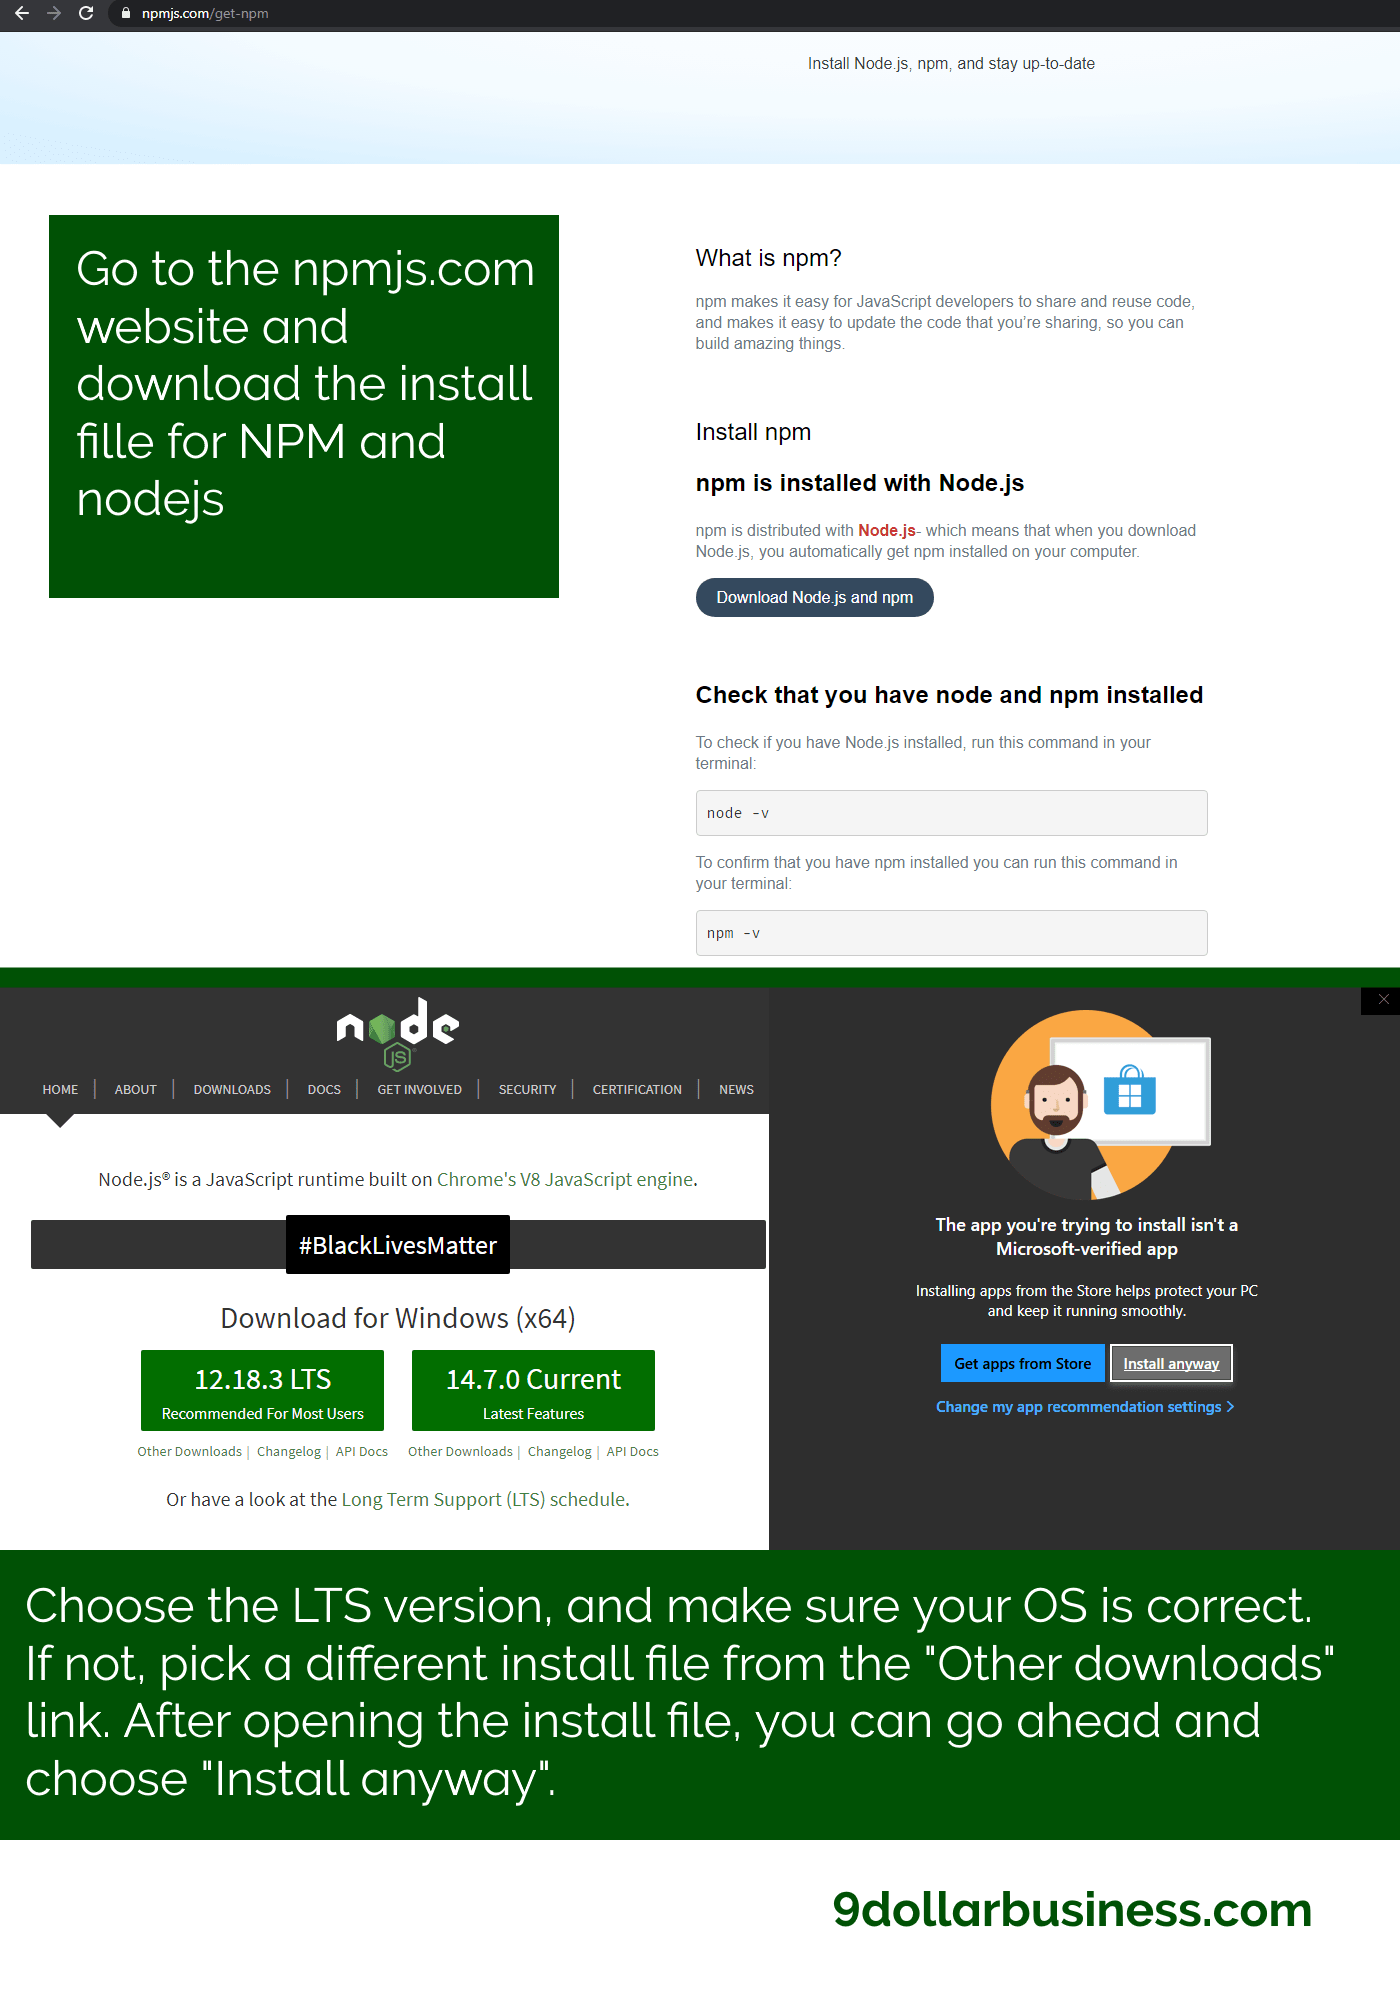
- Open a new browser tab and head over to https://www.npmjs.com/get-npm
- Click the “Download Node.js and npm” button
- The browser will probably detect your operating system and give you the correct link, but double-check to be sure. If your operating system is correct, click the “LTS” version.
- If you see the wrong operating system, simply click the “Other Downloads” link under the LTS and choose the installer for your operating system
- Open the installer. If you’re on Windows, you may get the option to install from the store, but choose “Install anyway”.
- Follow the steps in the installer, you can leave everything default
When the installation is done, go to your desktop and select a location for your project.
Open a command prompt there. To do this on Windows:
- Open the folder for your project
- Select the folder path in File Explorer
- Type “cmd” and hit Enter
Your Command Prompt will pop open. Don’t worry if your colors look different than mine, I’m just a big Matrix nerd.
Now you’re ready to install the Firebase tool for your project on your computer. Go back to the Firebase browser tab and follow the steps:
- Copy the first command:
npm install -g firebase-tools - Enter it into the command prompt and wait for the installation to finish
- You can leave the “Also show me the steps to add the Firebase JavaScript SDK to my web app” unchecked for now, you can do that later if you need it
- In the browser, click the Next button
- Continue to the next command:
firebase login - You will be taken to a browser window where you will choose the same Google account which you used for Firebase
- Click Allow
- The browser window and the command prompt will both report success
- Move on to the next command
firebase init - Follow the steps
- “Are you ready to proceed” -> y -> Enter
- “Which Firebase CLI features do you want to set up for this folder?” -> use the arrow keys and go to Hosting, hit Space, then hit Enter
- In the next step which is Project Setup, under “Please select an option”, choose “Use an existing project”
- Find your project (mine is dollarbusiness9 (9DollarBusiness) in the example), use the up and down arrow keys to move the caret to it, and hit Enter
- In the Hosting Setup step, under “What do you want to use as your public directory?”, just hit Enter
- “Configure as a single-page app (rewrite all urls to /index.html)?” -> y -> Enter
- Your command prompt will inform you that the Firebase initialization is complete
- In the Firebase browser window, after clicking Next, you will see the next command, enter it in the command prompt:
firebase deploy - After the deployment is complete, click “Continue to console”
The content of your website can be edited through the project folder on your computer now.

By this time, the DNS updates should be ready. We can try and connect our domain to the Firebase hosting.
Firebase hosting
To do that:
- Click “Add custom domain”
- Enter your domain name and click “Continue”
- Copy the values under “Host” and “Value”
- Go to your Cloudflare dashboard, and head over to the DNS tab (if your website is not ready yet, you will have to wait)
- Click “Add record”
- Select “TXT” for type, enter the host value in the Host field (usually same as your domain name), and enter the Google site verification value in the Content field (usually starts with “google-site-verification=xxx)
- Leave TTL to Auto
- Click Save
- Go back to the Firebase console and click the Verify button
- You will see the Setup step, continue with “Quick setup” and copy the values under the Value column
- Go to Cloudflare again
- Click “Add record” again
- Select “A” for the type, enter the domain name in the Host field, paste the first value in the “IPv4 Address” field, and click Save
- Repeat the above step for the second value
- Find the old “A” records, click the Edit link to their right, and click Delete, confirm the deletion in the popup window
- Your DNS record list should now have two A records, both with the orange cloud icon and the “Proxied” label next to it
- Go back to Firebase and click “Finish”, you will probably see your custom domain with a status “Needs setup”

This is the part where we have to wait again. Once the DNS records are updated, your website will be live!
I’ve noticed that this can take a while some times. Other times, the status may stay as “Needs setup” for quite a long time. If that happens, I suggest trying the following:
- Go to your Cloudflare dashboard
- Select the SSL/TLS tab
- In the first section, set the mode to Flexible, wait for a minute or two, and then set it back to Full
After this, the status in Firebase may stay as “Needs setup”, but your website will actually be live and functional.
Your business idea will need an email address, either so that people can contact you, or to set up email marketing and automation later.
Start by going to the Namecheap dashboard, selecting your domain from the domain list, and in the “Domain” tab, scroll down and in the “PRIVATE EMAIL” section, click the “Buy” button to the right. Don’t worry, we will not spend actual money here :), so the budget will remain $9.
On the next screen, select the “Trial” option, and then get the Starter plan. Select “Use a domain I own with Namecheap” on the next screen. Select your domain and click “Continue”, then “Add to cart”, then “Confirm order”, then agree to the terms and click “Pay now”. If your payment details are not remembered, you may have to enter them again, but you will not be charged any money since the cost of the trial is $0.
Once that’s done, click “Create mailboxes” on the next screen.
You will now have to copy the DNS values presented in the yellow box and add them to Cloudflare. Same as before:
- Go to Cloudflare -> DNS
- Delete any existing MX records
- Add the values from Namecheap
Then you can finally add a mailbox on Namecheap.
Click the “Create mailbox” button.
In the popup window, enter your name as the name, enter a secure password, and click “Save changes”. Then, you will be able to use a mailbox with your custom domain email address for free.
On the dropdown menu next to the Edit Storage button, select “Open webmail”. You will be taken to privateemail.com, where you will have access to your own email inbox.
Later, we will see how to use email marketing and automation for free as well!
Content
As I said before, probably the biggest downsides of this business will be the lack of WordPress. Since there’s no easy way to install WordPress on a free Firebase website, we’ll have to add the content to this website a bit differently. In fact, that’s the only reason that this guide can’t really be scalable and used for websites with many pages.
We will start this business as a single-page website.
Remember the project folder we created on your computer in the previous step? Well, that is how we’ll add content to the site.
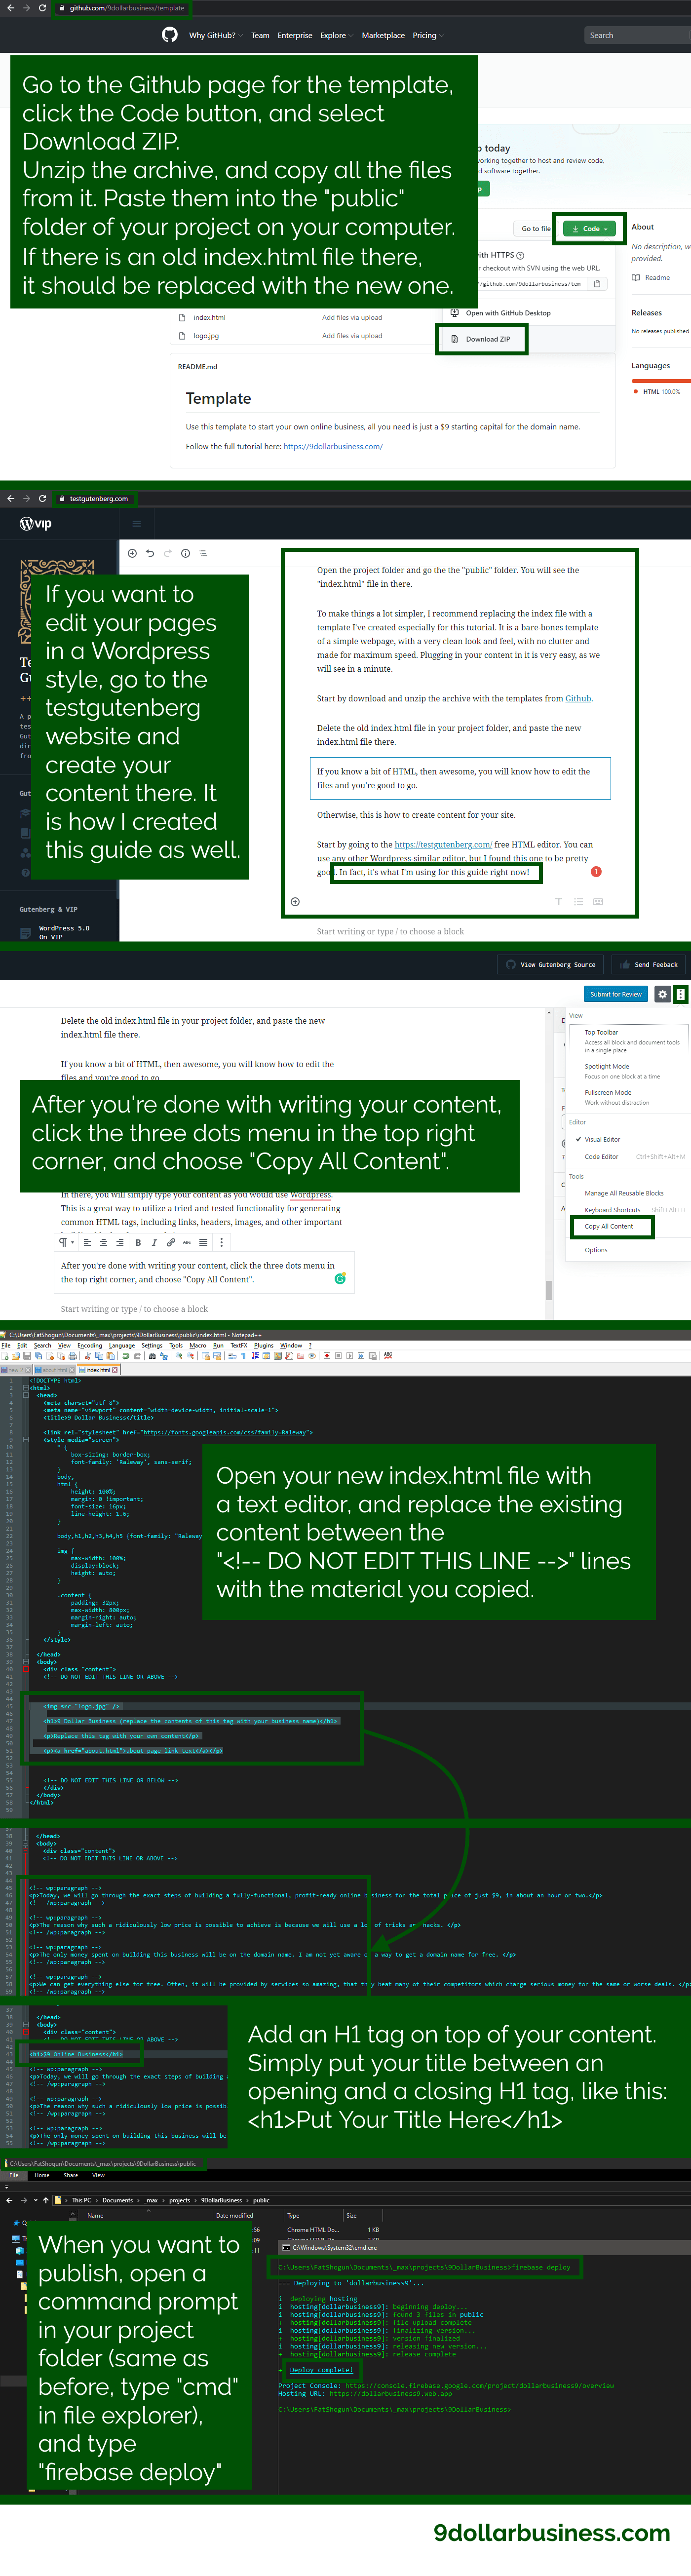
Open the project folder and go the the “public” folder. You will see the “index.html” file in there.
To make things a lot simpler, I recommend replacing the index file with a template I’ve created especially for this guide. It is a bare-bones template of a simple webpage, with a very clean look and feel, with no clutter and made for maximum speed. Plugging in your content in it is very easy, as we will see in a minute.
Start by download and unzip the archive with the templates from Github.
Delete the old index.html file in your project folder, and paste the new index.html file there.
If you know a bit of HTML, then awesome, you will know how to edit the files and you’re good to go.
Otherwise, this is how to create content for your site.
Start by going to the https://testgutenberg.com/ free HTML editor. You can use any other WordPress-similar editor, but I found this one to be pretty good. In fact, it’s what I’m using for this guide right now!
In there, you will simply type your content as you would use WordPress. This is a great way to utilize a tried-and-tested functionality for generating common HTML tags, including links, headers, images, and other important building blocks of every website.
After you’re done with writing your content, click the three dots menu in the top right corner, and choose “Copy All Content”.
Now open your new index.html file with a text editor, and replace the existing content between the “<!– DO NOT EDIT THIS LINE –>” lines with the material you copied.
There’s only one thing left to do, and that’s adding the H1 tag. You will have to do this manually. Simply enter your title between the tags like this:
- <h1>Your Title Here</h1>
And then paste the entire tag right below the top “<!– DO NOT EDIT THIS LINE –>” line.
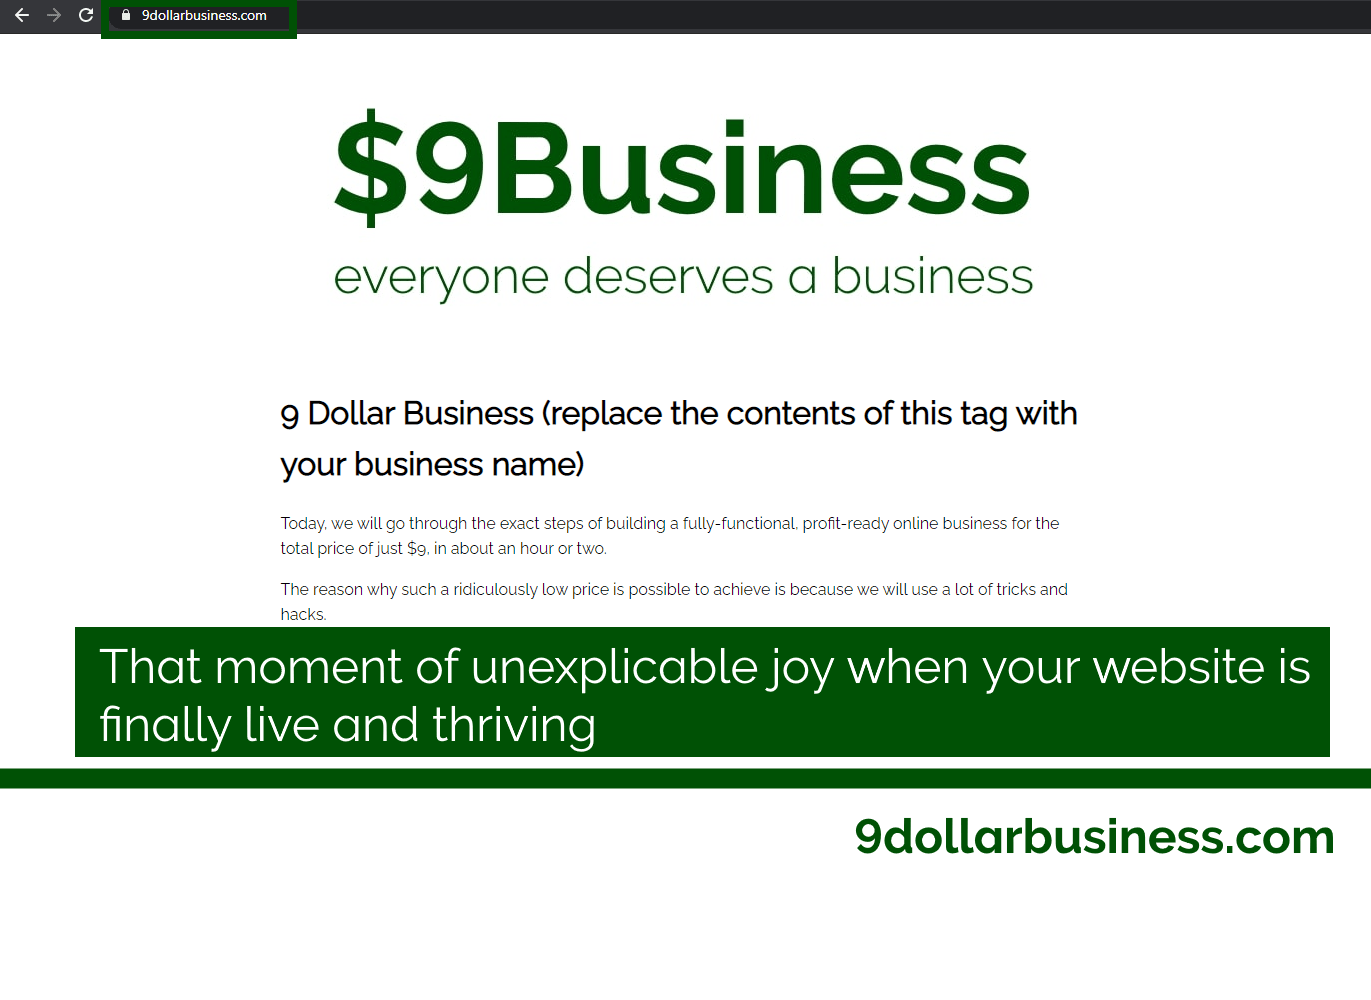
Your content is now ready to be published.
To go live, open a command prompt in the project folder and simply type:
- firebase deploy
Houston, we have takeoff. Your business is now live.
Other pages and links
The main purpose of this tutorial is to provide you with a way to create a simple wegpage for your business. Still, you can easily add multiple interlinked pages if you need to. You will need a very basic HTML knowledge for this, and the steps are simple as we will see.
First, to add a page, use the same “index.html” template as above, but rename the file to the URL path that you want your webpage to have.
For example, to create the About page of this tutorial, I grabbed the index file and renamed it to “about.html”.
Then, I edited the contents of the file in the same way as before. I just changed the title between the <h1> tags, and updated the content without touching below or above the specified lines.
To add a link to the new page from an old page, we will need to edit the file of the old page.
For example, to add a link to the new “about” page from the “index” page:
- Open the index.html file in a text editor
- Add an acnhor tag where you want the link to appear, the text between the tags is what the user will see as the link text, and the text in the href attribute is the full name of your file (together with the extension, like “about.html”)
- The anchor tag now looks like this: <a href=”about.html”>about page link text</a>
- Save the file
If you open the index file now, you will see a link where you placed it. Clicking it takes you to the page.
Logo
Not sure why, but this is one of my favorite parts.
There is no shortage of options to get a logo for your website. You can get one for under $5 on Fiverr, and it can be pretty spectacular what you can get for that amount. If you want a great logo, I suggest that option.
However, in the spirit of this guide, I’ll show you a very quick, very simple, totally free way to design a great, simple, clean looking logo yourself.
You will only need a tool like Paint.net (not sure what’s the Apple equivalent, but there must be some cool tool there as well).
Here’s how to craft a beautiful logo all by yourself:
- Pick a color for your brand first (I like Material color picker for this)
- Open a paint.net window
- Press Ctrl + N, then choose 900 pixels for the width, and 300 pixels for the height
- Make sure the color tool is visible, expand the “More” section, and enter the value you selected in the color picker in the “Hex” field
- Select the Text tool
- Pick a cool font, I like Raleway or Montserrat (if you don’t have them, open the links here, Download family -> Unzip -> open the static folder -> double click on any font to install in your system)
- Choose a font size that fills up your canvas nicely and simply type the name of your business, experiment a bit
- Optionally, if you can think of a slogan, enter it with a smaller font under the business name, use a different font if you want as well
- Save the file as a .jpg file
The end result will be a nice, simple, clean logo that you made yourself in under 3 minutes. And the best part is, it will be better than about 50% of the logos today, as it will convey the message of your business clearly.
If you want to use your newly created logo with the template I provide, simply delete the old logo.jpg file and paste your own logo.jpg file instead. Make sure the name and the extension are the same.
Images
You can host your images on your Firebase too.
If you want to keep things as simple as possible, simply add your images to your project in the “public” folder.
To add images:
- Add the image file in your “public” folder
- copy the name of the image along with its extension, for example: image_name.jpg
- Prepare the image tag by entering the image name as the src attribute: <img src=”image_name.jpg” />
- Simply enter the image tag where you want your image to appear
If you place your images in a separate folder, you will have to use the full path for the src attribute. For example, if you place the image_name.jpg image in the “images” folder, your img tag will look like: <img src=”images/image_name.jpg” />
Monetization
The simplest way to monetize your online business will be ads, affiliate links, or an ebook.
I recommend trying to create a digital product of your own, preferrably an ebook, then try to drive traffic to your page and sell your ebook.
Ads require a substantial amount of traffic to your webpage to earn you any serious money. That usually takes at least 6 months to start happening organically and consistently.
With an ebook or with affiliate links, you can start seeing your first sales in a week of launching. That is very encouraging.
This guide is already too long as it is, so we will only touch on the basics of these monetization methods.
Affiliate marketing
In case you’re not familiar with affiliate marketing, it simply means placing special links on your website, that if your readers click and buy from, you will earn a percentage from the sale.
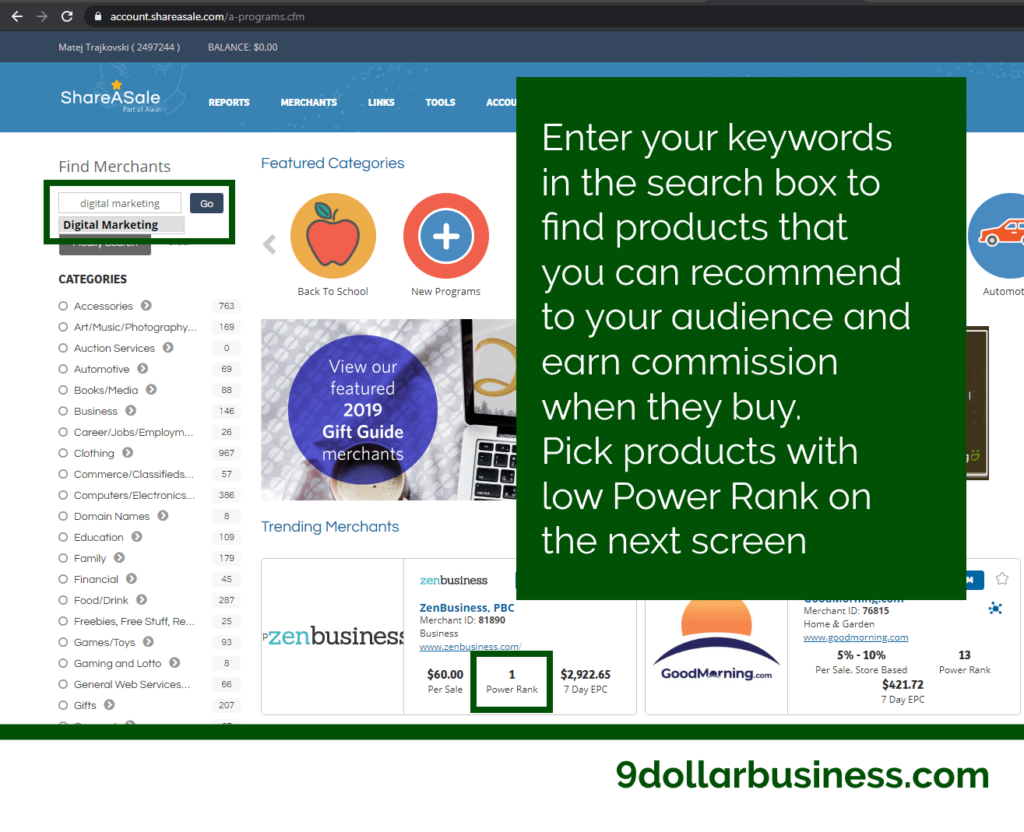
The best affiliate network to join is definitely ShareASale. They have the largest selection of high-quality merchants and products, you can take your pick.
Don’t forget to join with the custom email domain address we created, otherwise they will not let you join the program.
After you’re accepted, just head over to the menu Merchants -> Search for merchants, and type in some keywords related to your business or niche in the search box. Choose merchants or products with low Product Rank, the lower the better.
As an alternative, you can try joining Awin as they also have a ton of great products you can promote.
To add an affiliate link to your website, simply grab the link provided by the affiliate program you’ve joined, and put it in the href attribute of an anchor tag:
- <a href=”put_link_here”>link text</a>
Then, paste that entire tag in your text, and you’re ready to earn!
EBook
The reason why I recommend an ebook as the primary or one of the main monetization methods for your online business is because it’s the perfect balance between time investment and profit.
If you have at least some knowledge or experience in a topic, you are qualified to write an ebook. And the good news is, you don’t really need to spend another dime on it.
Sure, if you’re not good at design and want to give your ebook a more professional look and feel, then you’ll want to hire someone to do it for you (again, you can find really great pros on Fiverr for this).
But you alone can go a long way here.
I’ll use one of my other online businesses I’ve built as an example. In fact, that business started by following this guide almost to the letter and was one of the inspirations for it. Now it’s scaled up a bit, but it can still serve to demonstrate the power of a simple setup.
My other business is the Keto 3 Method, and the ebook in question is the ebook for the program.

The cover of the ebook was designed by me alone. Even though I pretty much suck at design, that cover at least isn’t terrible. And while this is entirely subjective, I believe it is actually quite well designed for an amateur. It has a very clean, simple design, that conveys the message of my program well, speaks to my target audience, and does my product a huge favor.
How I did it?
You may laugh, but I only used paint.net, Google Docs, and nothing else here.
For the cover, I used good ol’ paint.net to design it. I only played around with the fonts and font sizes (again, Raleway and Montserrat are a real blessing), and simply found an image of the egg without copyrights on Pexels (Unsplash are great for this too). Save the cover as an image file (.png or .jpg).
To create your ebook, just open a new Google Doc. Simply go Insert -> Image -> Upload from computer to add your cover at the first page.
Besides the cover, the only other thing you need to design is your page. That’s pretty much done for you by Google Docs. Here are some useful tips:
- Use a sans-serif font for the headings, like Raleway or Montserrat
- Use a serif font for the body, like Times New Roman or Georgia
- Use a font size of 12 for the body
- The easiest, cleanest way to establish some branding is to just use one color for the elements that stand out like the footer, and in the graphics as well
Aim for about 50 pages for the optimal ebook size.
Once you’re done in Google Docs, go File -> Download -> PDF document.
Congratulations, you have an ebook!
Creating a strong ebook that sells well is outside the focus area of this guide, but what I described here is a great start. You can check out a great Udemy course on writing a best-selling ebook for a few bucks, it’s a great investment if you plan on going down this route.
I sell my product with 2Checkout. These are the steps you need to take to sell your ebook with them:
- Register an account and log in
- On the left menu, choose Setup -> Products
- Click Add Product
- Fill out all the necessary information, add your price and your product descriptions (prices between $10 and $40 work well for this kind of product)
- Scroll to the bottom and click the Add Product button
- You should be taken to the product’s Information tab, if not, go there
- Scroll down to the Category dropdown, and select E-books & Literature
- Upload the image file of your cover for the product image
- Save
- Then head over to the Fulfillment tab
- Make sure that “Fulfillment made through 2Checkout delivery (binary keys, activation codes, Backup media, product file, DIS)” is selected for the Product fulfillment type
- In Content and methods, make sure that the Product file download links checkbox is checked
- Scroll down and click Save, the page will be refreshed
- In the Product files section, click the “Setup a new product file” link
- On the next screen, set the Display name, and upload the PDF file you exported from Google Docs
- Click the Upload file button
- Go back to the product’s Fulfillment page, and now in the Product files section, in the Assign product files dropdown list, your newly added PDF will be available as a product, select it, scroll down and click Save
- You are now ready to put buy links for your product on your webpage, in the Setup menu on the left select Generate links
- There are many checkout flows you can choose, and down the line you should really experiment and see what works best for your product, but for starting out I suggest going with the Inline checkout option
- In the JavaScript Code section, click the Copy button and paste that piece of code in a text editor, we will need it soon
- Scroll down to the “Select one or more products” section and choose your product
- In the “Generate Buy Button Code” section, click the Generate Code button, and again, copy the piece of code and paste it into the text editor
- We need to edit the code a little so that we can add the buying functionality on our simple website
- Open the index.html file in a text editor, and paste the first piece of code you copied (the one beginning with <script>) right under the first “<!– DO NOT EDIT THIS LINE –>” line
- Paste the second piece of code you copied wherever you want a buy link to appear
- Don’t forget to run the “firebase deploy” command from the command prompt after you’re done (same as before)
If you want to see how this looks in action, you can check out the buy functionality of the Keto 3 Method (no worries, you don’t have to buy it :)).
If you click the Buy button (which is same as the link, I just styled it to look like a button), an instant checkout window pops open that is ready to receive your customer’s payment details and deliver your product in their inbox.
And there we have it, after a bit of work, we now have a fully-operational oinline business that has all the moving parts right to start earning you profit.
Email marketing and automation
“The money is in the list” – digital marketers since 330 BC.
You may have heard this saying, and it will very likely be true for your business as well. As a new business that hasn’t built any trust with your audience yet, building value through email campaigns will be your strongest weapon.
But sending emails every day, remembering which group has received which email, what action to take, that all means you don’t really have a business, but only have another job.
What we want is more than email marketing. It’s email automation.
The bad news is, while there are many email marketing providers that offer free features, they usually charge money for the most important part, which is the automation. And since we already spent our $9, we can’t accept that.
Luckily, there is one amazing email marketing service that includes automation in its free starter plan.
That is MailerLite. And since getting email automation for free is a real game changer, we have to give huge kudos to them.
After registering an account with them and filling out all the necessary info, you will have to get approved by their team. I suggest adding at least a few blog posts following the guide above to increase your chances for approval. Also, use the email address with the custom domain name we created, which greatly increases your chances of success. Ultimately, if you don’t get accepted and you need email automation, I suggest trying out their lowest-priced plan, it’s a great investment in your business for an additional $10/month.
Once you are approved, you will add a popup to your site asking for your user’s email address. These are the steps to achieve that:
- From the Dashboard, click Subscribers -> Groups tab -> Create group button, and give a name to your group
- Then select Forms, and then click Create popup
- Give your popup a name, and click Save and continue
- Select the group you created on the next screen
- I suggest the Full Screen template for maximum conversion
- Promote your email newsletter or product in the copy, you don’t need to mess around with the design too much as this is tested and converts pretty well, just change the text
- Click the Next button
- On the next screen, I like setting the Wait period to 30 seconds, and the Frequency to 1 week, the rest of the settings are fine
- Click Save and continue
- You will see your code on the next screen, copy it and paste it in your index.html file right under the first “<!– DO NOT EDIT THIS LINE –>” line and run the “firebase deploy” from the command prompt after you’re done (as we did before)
- After clicking next in Mailerlite, you will set the status to Active on the next screen
- Then click the Automation tab, and click the Create a workflow button
Ok, we’re in email automation land now. There are a lot of cool, crazy, highly-profitable things you can do here, build all sorts of workflows and funnels and A/B testings. Describing all of that here would be outside the scope of this guide, so we’ll cover creating a solid starting workflow, and you will take it from there and experiment to maximize your profits.
Try this out:
- Click the plus button and add an email
- Enter the subject, tick the Google Analytics checkbox, and click design email
- Keep things simple and select the Rich-text editor, no need for fancy newsletter designs yet
- Craft an email that provides your audience with something valuable, teach them something or offer them something cool, don’t try to sell them too hard here, maybe just one link, keep your email simple and clean
- Save the email and go back to the workflow
- Click the plus button again and add a Delay, and set it to one day
- Add another email after the delay, and craft another value-providing email
- Add another delay of one day after the second email
- You can repeat the Email + Delay step several times, my “Free Keto 7-Step Mastery Course” gives my subscribers value for 7 days for example, in general the more value you provide to your users, the more they will trust you
- After several value-providing emails, you can craft an email that will pitch your product to your audience
- After you’re done, don’t forget to set the workflow status to Active
And with that done, now not only do you have a running online business, but you have a process that does all the heavy lifting for you.
Not too bad for $9, right?
What’s next?
While this is a great starting point, chances are you will need to scale your business pretty soon.
This guide will be updated and become a series of similar step-by-step tutorials. My plan is to add the following sections when I have a bit more time:
- Google Analytics (we actually set this one up and you can look at your reports in the Google Analytics console, but we should go over how to read and understand the reports so that you can grow your business)
- Google Console (not that urgent in the beginning, since your site will probably not rank in Google search results any time soon without adding much more content)
- Adding a social sharing plugin through AddThis to increase traffic to your business (next step)
- Adding the Facebook comments plugin that will increase the engagement of your readers (coming soon)
- Adding a redirect for people that type “www.yourdomain.com”
Until then, I recommend:
- BitDegree’s very inexpensive Complete Digital Marketing Course: Find Fast & Easy Success for acquiring more knowledge on digital marketing in general
- the One Funnel Away Challenge by ClickFunnels to really step up your game and take your business to the next level
- BitDegree’s WordPress Course: How to Use this CMS to Manage Your Website if you’re ready to learn how to jump over to WordPress and scale what you started
Hope this guide was valuable to you and helped you launch your very own business. If it did, I would appreciate you spreading the word.
Stay tuned until the next guide in this series, which will go deeper into how to create a profitable product for free as well.

- SEO, Blogging, WordPress
- Social Media Marketing
- Facebook Ads
- Google Ads
- Analytics, Measurements
- Youtube and Video
- Growth Hacking
- Much more